Excel'de aylık/yıllık takvim nasıl oluşturulur?
Bazen Excel'de belirli bir ay veya yıl takvimi oluşturmanız gerekebilir, bu sorunu hızlıca nasıl çözebilirsiniz? Bu öğretici, Excel'de aylık veya yıllık takvim oluşturmak için kullanabileceğiniz ipuçlarını tanıtmaktadır.
Excel Şablonu ile Aylık veya Yıllık Takvim Oluşturun
VBA ile Aylık Takvim Oluşturun
Sürekli Takvim ile Kolayca Aylık veya Yıllık Takvim Oluşturun
Excel Şablonu ile Aylık veya Yıllık Takvim Oluşturun
Excel'de, aylık veya yıllık bir takvim oluşturmak için bir takvim şablonu kullanabilirsiniz.
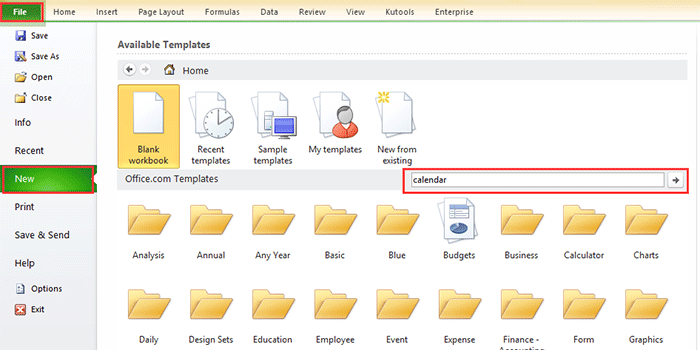
1. Excel 2010/2013'te, Dosya > Yeni'ye tıklayın, Excel 2007'de Office Düğmesi > Yeni'ye tıklayın, ardından açılan pencerenin sağ bölümündeki arama motoruna takvim yazın. Ekran görüntüsüne bakın:
Excel 2010/2013'te
Excel 2007'de

2. Enter tuşuna basın, ardından pencerede birden fazla takvim türü listelenir. İhtiyacınız olan takvim türünü seçin ve sağdaki bölmedeki İndir (veya Oluştur) düğmesine tıklayın. Ekran görüntüsüne bakın:

Şimdi yeni bir çalışma kitabında bir takvim oluşturuldu. Ekran görüntüsüne bakın:

VBA ile Aylık Takvim Oluşturun
Bazen belirli bir ay için bir aylık takvim oluşturmanız gerekebilir, örneğin Ocak 2015. Yukarıdaki yöntemle böyle bir takvim şablonu bulmak biraz zor olabilir. Burada size belirli bir aylık takvim oluşturmanıza yardımcı olacak bir VBA kodu tanıtıyorum.
1. Alt + F11 tuşlarına basarak Microsoft Visual Basic for Applications penceresini açın, Ekle > Modül'e tıklayın, ardından aşağıdaki VBA kodunu pencereye kopyalayıp yapıştırın.
VBA: Aylık takvim oluşturun.
Sub CalendarMaker()
       ' Unprotect sheet if had previous calendar to prevent error.
       ActiveSheet.Protect DrawingObjects:=False, Contents:=False, _
          Scenarios:=False
       ' Prevent screen flashing while drawing calendar.
       Application.ScreenUpdating = False
       ' Set up error trapping.
       On Error GoTo MyErrorTrap
       ' Clear area a1:g14 including any previous calendar.
       Range("a1:g14").Clear
       ' Use InputBox to get desired month and year and set variable
       ' MyInput.
       MyInput = InputBox("Type in Month and year for Calendar ")
       ' Allow user to end macro with Cancel in InputBox.
       If MyInput = "" Then Exit Sub
       ' Get the date value of the beginning of inputted month.
       StartDay = DateValue(MyInput)
       ' Check if valid date but not the first of the month
       ' -- if so, reset StartDay to first day of month.
       If Day(StartDay) <> 1 Then
           StartDay = DateValue(Month(StartDay) & "/1/" & _
               Year(StartDay))
       End If
       ' Prepare cell for Month and Year as fully spelled out.
       Range("a1").NumberFormat = "mmmm yyyy"
       ' Center the Month and Year label across a1:g1 with appropriate
       ' size, height and bolding.
       With Range("a1:g1")
           .HorizontalAlignment = xlCenterAcrossSelection
           .VerticalAlignment = xlCenter
           .Font.Size = 18
           .Font.Bold = True
           .RowHeight = 35
       End With
       ' Prepare a2:g2 for day of week labels with centering, size,
       ' height and bolding.
       With Range("a2:g2")
           .ColumnWidth = 11
           .VerticalAlignment = xlCenter
           .HorizontalAlignment = xlCenter
           .VerticalAlignment = xlCenter
           .Orientation = xlHorizontal
           .Font.Size = 12
           .Font.Bold = True
           .RowHeight = 20
       End With
       ' Put days of week in a2:g2.
       Range("a2") = "Sunday"
       Range("b2") = "Monday"
       Range("c2") = "Tuesday"
       Range("d2") = "Wednesday"
       Range("e2") = "Thursday"
       Range("f2") = "Friday"
       Range("g2") = "Saturday"
       ' Prepare a3:g7 for dates with left/top alignment, size, height
       ' and bolding.
       With Range("a3:g8")
           .HorizontalAlignment = xlRight
           .VerticalAlignment = xlTop
           .Font.Size = 18
           .Font.Bold = True
           .RowHeight = 21
       End With
       ' Put inputted month and year fully spelling out into "a1".
       Range("a1").Value = Application.Text(MyInput, "mmmm yyyy")
       ' Set variable and get which day of the week the month starts.
       DayofWeek = WeekDay(StartDay)
       ' Set variables to identify the year and month as separate
       ' variables.
       CurYear = Year(StartDay)
       CurMonth = Month(StartDay)
       ' Set variable and calculate the first day of the next month.
       FinalDay = DateSerial(CurYear, CurMonth + 1, 1)
       ' Place a "1" in cell position of the first day of the chosen
       ' month based on DayofWeek.
       Select Case DayofWeek
           Case 1
               Range("a3").Value = 1
           Case 2
               Range("b3").Value = 1
           Case 3
               Range("c3").Value = 1
           Case 4
               Range("d3").Value = 1
           Case 5
               Range("e3").Value = 1
           Case 6
               Range("f3").Value = 1
           Case 7
               Range("g3").Value = 1
       End Select
       ' Loop through range a3:g8 incrementing each cell after the "1"
       ' cell.
       For Each cell In Range("a3:g8")
           RowCell = cell.Row
           ColCell = cell.Column
           ' Do if "1" is in first column.
           If cell.Column = 1 And cell.Row = 3 Then
           ' Do if current cell is not in 1st column.
           ElseIf cell.Column <> 1 Then
               If cell.Offset(0, -1).Value >= 1 Then
                   cell.Value = cell.Offset(0, -1).Value + 1
                   ' Stop when the last day of the month has been
                   ' entered.
                   If cell.Value > (FinalDay - StartDay) Then
                       cell.Value = ""
                       ' Exit loop when calendar has correct number of
                       ' days shown.
                       Exit For
                   End If
               End If
           ' Do only if current cell is not in Row 3 and is in Column 1.
           ElseIf cell.Row > 3 And cell.Column = 1 Then
               cell.Value = cell.Offset(-1, 6).Value + 1
               ' Stop when the last day of the month has been entered.
               If cell.Value > (FinalDay - StartDay) Then
                   cell.Value = ""
                   ' Exit loop when calendar has correct number of days
                   ' shown.
                   Exit For
               End If
           End If
       Next

       ' Create Entry cells, format them centered, wrap text, and border
       ' around days.
       For x = 0 To 5
           Range("A4").Offset(x * 2, 0).EntireRow.Insert
           With Range("A4:G4").Offset(x * 2, 0)
               .RowHeight = 65
               .HorizontalAlignment = xlCenter
               .VerticalAlignment = xlTop
               .WrapText = True
               .Font.Size = 10
               .Font.Bold = False
               ' Unlock these cells to be able to enter text later after
               ' sheet is protected.
               .Locked = False
           End With
           ' Put border around the block of dates.
           With Range("A3").Offset(x * 2, 0).Resize(2, _
           7).Borders(xlLeft)
               .Weight = xlThick
               .ColorIndex = xlAutomatic
           End With

           With Range("A3").Offset(x * 2, 0).Resize(2, _
           7).Borders(xlRight)
               .Weight = xlThick
               .ColorIndex = xlAutomatic
           End With
           Range("A3").Offset(x * 2, 0).Resize(2, 7).BorderAround _
              Weight:=xlThick, ColorIndex:=xlAutomatic
       Next
       If Range("A13").Value = "" Then Range("A13").Offset(0, 0) _
          .Resize(2, 8).EntireRow.Delete
       ' Turn off gridlines.
       ActiveWindow.DisplayGridlines = False
       ' Protect sheet to prevent overwriting the dates.
       ActiveSheet.Protect DrawingObjects:=True, Contents:=True, _
          Scenarios:=True

       ' Resize window to show all of calendar (may have to be adjusted
       ' for video configuration).
       ActiveWindow.WindowState = xlMaximized
       ActiveWindow.ScrollRow = 1

       ' Allow screen to redraw with calendar showing.
       Application.ScreenUpdating = True
       ' Prevent going to error trap unless error found by exiting Sub
       ' here.
       Exit Sub
   ' Error causes msgbox to indicate the problem, provides new input box,
   ' and resumes at the line that caused the error.
   MyErrorTrap:
       MsgBox "You may not have entered your Month and Year correctly." _
           & Chr(13) & "Spell the Month correctly" _
           & " (or use 3 letter abbreviation)" _
           & Chr(13) & "and 4 digits for the Year"
       MyInput = InputBox("Type in Month and year for Calendar")
       If MyInput = "" Then Exit Sub
       Resume
   End Sub
VBA kodu şu web sitesinden alınmıştır https://support.microsoft.com/en-us/kb/150774
2. F5 tuşuna basın veya Çalıştır düğmesine tıklayın ve oluşturmak istediğiniz belirli ayı girmenizi hatırlatan bir iletişim kutusu açılacaktır, ekran görüntüsüne bakın:

3. Tamam'a tıklayın. Şimdi Ocak 2015 takvimi etkin çalışma sayfasında oluşturulmuştur.

Ancak yukarıdaki yöntemlerde bazı sınırlamalar bulunmaktadır, örneğin Ocak'tan Mayıs'a kadar bir takvim oluşturmak isterseniz, yukarıdaki iki yöntemle beş kez takvim oluşturmanız gerekir. Şimdi size bu sorunu hızlı ve kolay bir şekilde çözmek için kullanışlı bir araç tanıtacağım.
Sürekli Takvim ile Kolayca Aylık veya Yıllık Takvim Oluşturun
Sürekli Takvim, Kutools for Excel'in güçlü yardımcı programlarından biridir ve size Excel'de tek seferde aylık veya yıllık takvim oluşturmanıza yardımcı olabilir.
1. Kutools Plus > Çalışma Sayfası > Sürekli Takvim'e tıklayın.
2. Açılır diyalogda, takvimi oluşturmak istediğiniz ay süresini belirtin ve Oluştur'a tıklayın. Ekran görüntüsüne bakın:

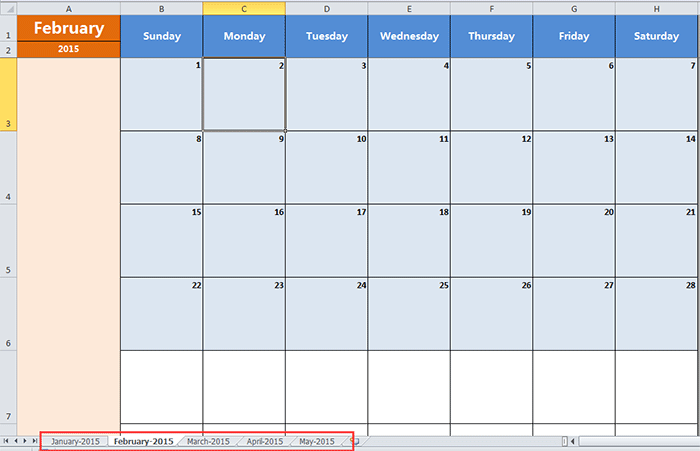
Ardından beş takvim çalışma sayfasına sahip yeni bir çalışma kitabı oluşturulur. Ekran görüntüsüne bakın:
İpucu:
Eğer yalnızca belirli bir aylık takvim oluşturmak istiyorsanız, diyalogdaki Başlangıç ve Bitiş metin kutularına aynı ayı seçmeniz yeterlidir.
Sürekli Takvim hakkında daha fazla bilgi edinmek için buraya tıklayın
En İyi Ofis Verimlilik Araçları
Kutools for Excel ile Excel becerilerinizi güçlendirin ve benzersiz bir verimlilik deneyimi yaşayın. Kutools for Excel, üretkenliği artırmak ve zamandan tasarruf etmek için300'den fazla Gelişmiş Özellik sunuyor. İhtiyacınız olan özelliği almak için buraya tıklayın...
Office Tab, Ofis uygulamalarına sekmeli arayüz kazandırır ve işinizi çok daha kolaylaştırır.
- Word, Excel, PowerPoint'te sekmeli düzenleme ve okuma işlevini etkinleştirin.
- Yeni pencereler yerine aynı pencerede yeni sekmelerde birden fazla belge açıp oluşturun.
- Verimliliğinizi %50 artırır ve her gün yüzlerce mouse tıklaması azaltır!
Tüm Kutools eklentileri. Tek kurulum
Kutools for Office paketi, Excel, Word, Outlook & PowerPoint için eklentileri ve Office Tab Pro'yu bir araya getirir; Office uygulamalarında çalışan ekipler için ideal bir çözümdür.
- Hepsi bir arada paket — Excel, Word, Outlook & PowerPoint eklentileri + Office Tab Pro
- Tek kurulum, tek lisans — dakikalar içinde kurulun (MSI hazır)
- Birlikte daha verimli — Ofis uygulamalarında hızlı üretkenlik
- 30 günlük tam özellikli deneme — kayıt yok, kredi kartı yok
- En iyi değer — tek tek eklenti almak yerine tasarruf edin