Outlook'da gönderdiğiniz tüm e-postaları otomatik olarak gizli kopyalama (BCC) yapmak için nasıl bir yöntem izlenir?
Bir e-posta gönderirken kalıcı bir gizli alıcınız varsa ve diğer alıcıların bu kişinin adresini görmesini istemiyorsanız, BCC işlevini kullanmalısınız. Ancak BCC yapmak istediğimizde, manuel olarak BCC alanını göstermek ve bir kişi seçmek zorunda kalırız. Bu manuel işlemleri önlemek için aşağıdaki makale, Outlook'u tüm gönderilen e-postalarda belirli bir e-posta adresine otomatik olarak BCC yapacak şekilde nasıl değiştireceğinizi gösterecek.
- VBA kullanarak Outlook'ta varsayılan otomatik BCC
- Kutools for Outlook kullanarak Outlook'ta otomatik BCC
VBA kullanarak Outlook'ta varsayılan otomatik BCC
Aşağıdaki VBA kodunu uygulayarak Outlook'ta otomatik BCC kuralını yapılandırabilirsiniz. Lütfen şu adımları izleyin:
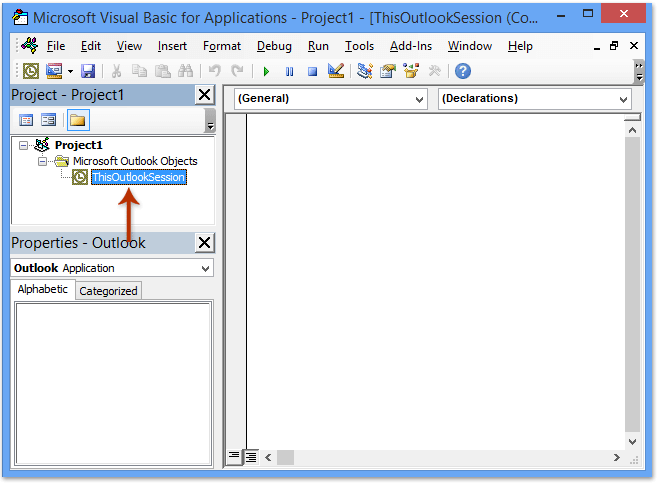
1. Microsoft Visual Basic for Applications penceresini açmak için Alt + F11 tuşlarına aynı anda basın.
2. Proje bölmesinde ThisOutlookSession öğesine çift tıklayın ve ardından aşağıdaki VBA kodunu açılan pencereye yapıştırın. Aşağıdaki ekran görüntüsüne bakın:
VBA Kodu: Tüm e-postaları gönderirken otomatik BCC
Private Sub Application_ItemSend(ByVal Item As Object, Cancel As Boolean)
Dim objRecip As Recipient
    Dim strMsg As String
    Dim res As Integer
    Dim strBcc As String
    On Error Resume Next

    ' #### USER OPTIONS ####
    ' address for Bcc -- must be SMTP address or resolvable
    ' to a name in the address book
    strBcc = "SomeEmailAddress@domain.com"

    Set objRecip = Item.Recipients.Add(strBcc)
    objRecip.Type = olBCC
    If Not objRecip.Resolve Then
        strMsg = "Could not resolve the Bcc recipient. " & _
                 "Do you want still to send the message?"
        res = MsgBox(strMsg, vbYesNo + vbDefaultButton1, _
                 "Could Not Resolve Bcc Recipient")
        If res = vbNo Then
            Cancel = True
        End If
    End If

    Set objRecip = Nothing
End Sub
Not: Yukarıdaki kodda "SomeEmailAddress@domain.com" ifadesini BCC yapmak istediğiniz e-posta adresiyle değiştirin.
3. VBA kodunu kaydedin ve Microsoft Visual Basic for Applications penceresini kapatın.
Artık BCC alanına adres girmenize gerek yok. Outlook üzerinden e-posta gönderdiğinizde, VBA kodunun çalışması sayesinde otomatik olarak istediğiniz alıcıya BCC yapılacaktır.
Kutools for Outlook kullanarak Outlook'ta otomatik BCC
Yukarıdaki VBA kodu, biz başlangıç seviyesindeki kullanıcılar için biraz zor ve karmaşık olabilir. İşte size kolay ve hızlı bir araç - Kutools for Outlook, Outlook'ta gönderdiğiniz tüm e-postaları veya belirli e-postaları otomatik olarak BCC yapmanıza yardımcı olacaktır.
Outlook verimsizliğine veda edin! Kutools for Outlook, toplu e-posta işleme işini kolaylaştırır - artık ücretsiz AI destekli özelliklerle! Kutools for Outlook'u Şimdi İndirin!!
Kutools for Outlook'u yükledikten sonra lütfen şu adımları izleyin:
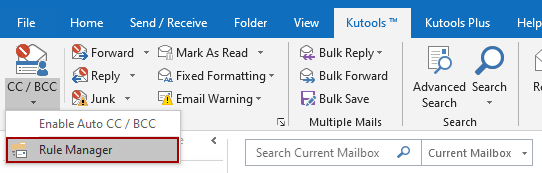
1. Kutools > Otomatik CC / BCC > Kural Yönetimi'ne tıklayın, aşağıdaki ekran görüntüsüne bakın:
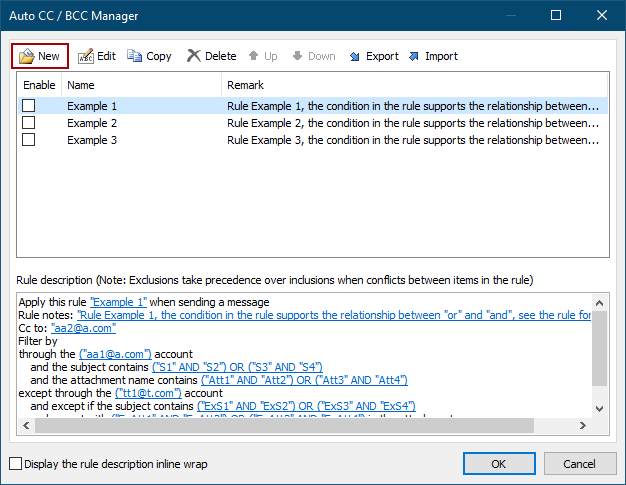
2. Otomatik CC / BCC Yönetici iletişim kutusunda Yeni düğmesine tıklayın.
3. Kural Sihirbazı'nda, e-postaları filtrelemek için koşulları belirtin. Benim durumumda, metin gövdesinde belirli kelimeler içeren seçeneğini işaretledim ve ardından altı çizili 'belirli kelimeler' metnine tıklayarak düzenledim.

4. Metin İçerir iletişim kutusunda, yeni kelimeler eklemek için Yeni düğmesine tıklayın.
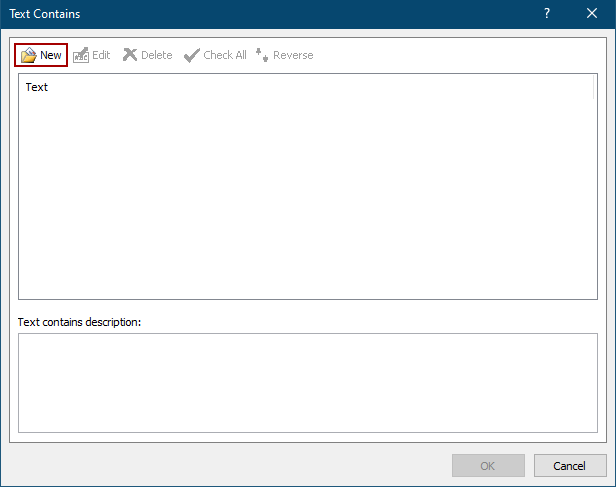
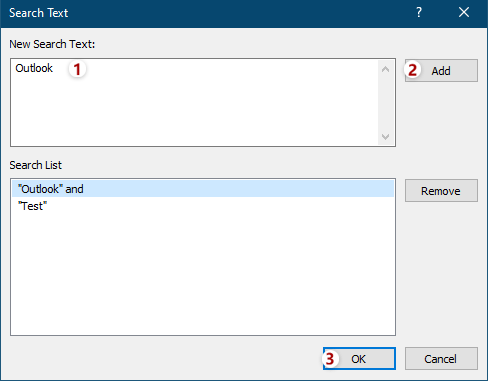
5. Arama Metni iletişim kutusunda, bir kelime yazın Yeni Arama Metni kutusuna, ardından Ekle düğmesine tıklayın ve ardından Tamam düğmesine tıklayın.
İpuçları: Aynı anda birden fazla kelime eklemek için, New Search Text box and click the Add button, then repeat this operation to add other words one by one, and finally click the OK button.
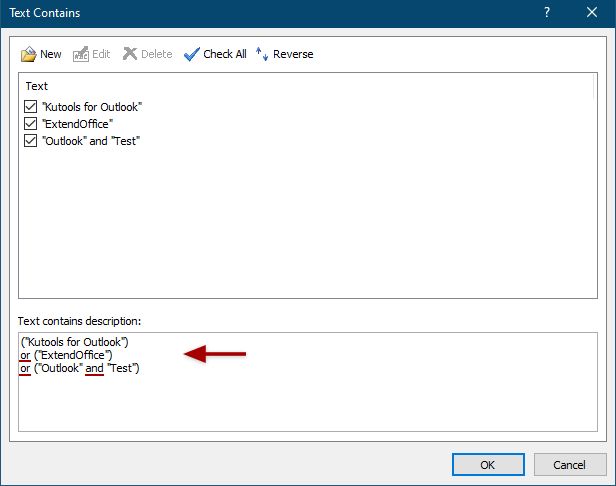
6. Now it goes back to the Text Contains dialog. If necessary, you can go on to click the New button to add other words as you need, and then click the OK button to save these words.
Tips: If you add multiple words in the same Search Text box simultaneously, the relationship between these words is "AND". If you add multiple words by clicking the New button successively, the relationship between these words is "OR".
7. Then it returns to the Rules Wizard, specify other conditions as you need, and click the Next button.
8. In the second Rules Wizard, specify exceptions or do not check any exceptions as you need, and click the Next button.
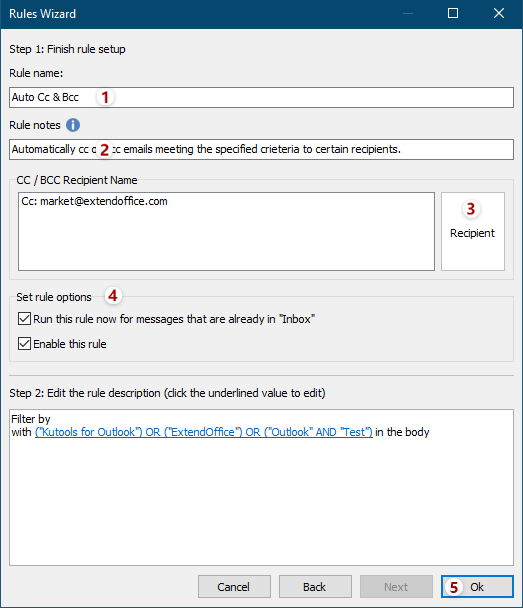
9. In the third Rules Wizard, please type a name for this new Bcc rule in the Rule Name box, enter descriptions for the rule in the Rule notes box, click the Recipient button to add Cc or Bcc recipients, tick running options in the Set rule options section, and click the OK button.
10. In the Auto CC / BCC Manager, make sure the new Cc/Bcc rule is checked, and cock the OK button to close the dialog.
11. Go ahead to click Kutools > CC / BCC > Enable Auto CC / BCC in the Outlook main interface to enable the rule.
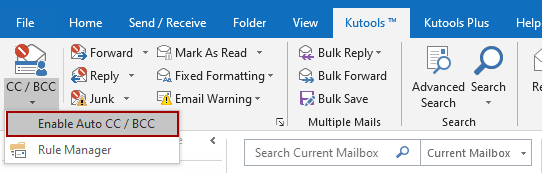
And click the OK button in the popping out reconfirmation dialog.
So far the bcc rule has been created, when you sending an email, the same message will send to the bcc recipient at the same time.
Notes:
(1) With this function, you can set the always CC rules as well.
(2) You can create multiple rules as your need by using this tool.
(3) If you want to close the rules, you can click Enable Auto CC / BCC, and all of the rules will not work. Also you can uncheck the rules name in the Auto CC / BCC Manager dialog box to disable some specified rules.
Related article:
How to automatically cc myself always in Outlook?
En İyi Ofis Verimlilik Araçları
Son Dakika: Kutools for Outlook Ücretsiz Sürümünü Sunmaya Başladı!
Yepyeni Kutools for Outlook ile100'den fazla etkileyici özelliği deneyimleyin! Şimdi indir!
📧 E-posta Otomasyonu: Otomatik Yanıt (POP ve IMAP için kullanılabilir) / E-posta Gönderimini Zamanla / E-posta Gönderirken Kurala Göre Otomatik CC/BCC / Gelişmiş Kurallar ile Otomatik Yönlendirme / Selamlama Ekle / Çoklu Alıcılı E-postaları Otomatik Olarak Bireysel Mesajlara Böl...
📨 E-posta Yönetimi: E-postayı Geri Çağır / Konu veya diğer kriterlere göre dolandırıcılık amaçlı e-postaları engelle / Yinelenen e-postaları sil / Gelişmiş Arama / Klasörleri Düzenle...
📁 Ekler Pro: Toplu Kaydet / Toplu Ayır / Toplu Sıkıştır / Otomatik Kaydet / Otomatik Ayır / Otomatik Sıkıştır...
🌟 Arayüz Büyüsü: 😊 Daha Fazla Şık ve Eğlenceli Emoji / Önemli e-postalar geldiğinde uyarı / Outlook'u kapatmak yerine küçült...
👍 Tek Tıkla Harikalar: Tümüne Eklerle Yanıtla / Kimlik Avı E-postalarına Karşı Koruma / 🕘 Gönderenin Saat Dilimini Göster...
👩🏼🤝👩🏻 Kişiler & Takvim: Seçilen E-postalardan Toplu Kişi Ekle / Bir Kişi Grubunu Bireysel Gruplara Böl / Doğum günü hatırlatıcısını kaldır...
Kutools'u tercih ettiğiniz dilde kullanın – İngilizce, İspanyolca, Almanca, Fransızca, Çince ve40'tan fazla başka dili destekler!


🚀 Tek Tıkla İndir — Tüm Ofis Eklentilerini Edinin
Şiddetle Tavsiye Edilen: Kutools for Office (5'i1 arada)
Tek tıkla beş kurulum paketini birden indirin — Kutools for Excel, Outlook, Word, PowerPoint ve Office Tab Pro. Şimdi indir!
- ✅ Tek tık kolaylığı: Beş kurulum paketinin hepsini tek seferde indirin.
- 🚀 Her türlü Ofis görevi için hazır: İhtiyacınız olan eklentileri istediğiniz zaman yükleyin.
- 🧰 Dahil olanlar: Kutools for Excel / Kutools for Outlook / Kutools for Word / Office Tab Pro / Kutools for PowerPoint