Outlook'da kategorileri nasıl içe ve dışa aktarabilirsiniz?
Outlook, e-postalarınızı etkili bir şekilde düzenlemenize olanak tanıyan Outlook'ta birçok renk kategorisi oluşturmanıza izin verir. Ayrıca bu özelleştirilmiş kategorileri meslektaşlarınızla paylaşmak veya yeni bir bilgisayara aktarmak için dışa aktarabilirsiniz. Bu makale, Microsoft Outlook'ta kategorilerinizi dışa ve içe aktarma konusunda adım adım bir rehber sunarak farklı platformlar arasında organizasyon sistemini korumanızı veya başkalarıyla paylaşmanızı sağlar.
Microsoft Outlook'tan kategorileri dışa aktarma
Microsoft Outlook'a kategorileri içe aktarma
Microsoft Outlook'tan kategorileri dışa aktarma
Varsayılan kategoriler ve özelleştirilmiş kategoriler dahil olmak üzere tüm renk kategorileri Microsoft Outlook'tan dışa aktarılabilir. Bunu şu şekilde yapabilirsiniz:
Adım 1: Notlar bölümüne gidin.
Outlook pencerenizin sol tarafındaki gezinti bölmesinin altındaki üç noktaya (...) tıklayın ve daha fazla seçenek görüntülemek için açılan menüden Notlar'ı seçin.
Adım 2: Yeni bir not oluşturun.
Ana Sayfa sekmesinde, Yeni Grup altında Yeni Not'u tıklayın. Yeni not iletişim kutusunda, içine bir metin yazın. Bu durumda, Kategoriler metnini giriyoruz.
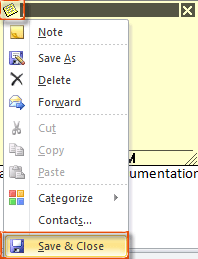
Adım 3: Not penceresinin sol üst köşesindeki düğmeye tıklayın ve ardından Outlook'ta Kaydet ve Kapat 'ı tıklayın.
Adım 4: Gezinti Bölmesi'ndeki Not simgesine tıklayarak Not görünümüne geçin.
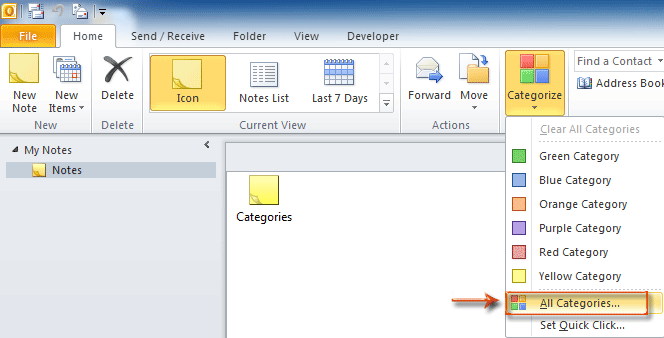
Adım 5: Daha önce oluşturduğunuz nota tıklayın ve ardından Ana Sayfa sekmesindeki Etiketler grubunda Kategorilendir > Tüm Kategoriler'i tıklayın.
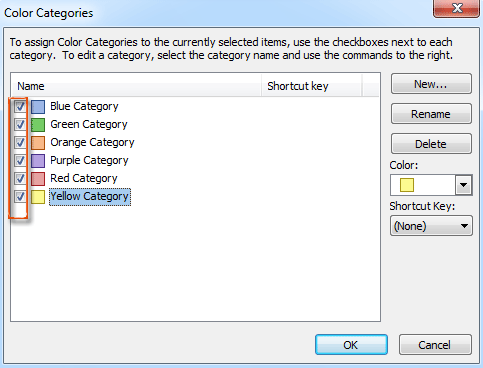
Adım 6: Renk Kategorileri iletişim kutusunda, daha sonra dışa aktaracağınız renk kategorilerini işaretleyin ve ardından Tamam düğmesine tıklayın.
Adım 7: Notu sürükleyip Windows'un bir klasörüne kaydedin. Bu not .msg dosyası olarak kaydedilecektir.
Outlook'daki AI Mail Asistanı: Daha Akıllı Yanıtlar, Daha Açık İletişim (tek tıklama sihirbazlığı!) ÜCRETSİZ
Kutools for Outlook'un AI Mail Asistanı ile günlük Outlook görevlerinizi kolaylaştırın. Bu güçlü araç, geçmiş e-postalarınızdan öğrenerek size akıllı ve doğru yanıtlar sunar, e-posta içeriğinizi optimize eder ve mesaj taslaklarını hazırlamada ve geliştirmede size yardımcı olur.

Bu özellik şunları destekler:
- Akıllı Yanıtlar: Geçmiş konuşmalarınızdan oluşturulan, kişiselleştirilmiş, kesin ve kullanıma hazır yanıtlar alın.
- Geliştirilmiş İçerik: E-posta metniniz otomatik olarak netlik ve etki için iyileştirilir.
- Kolay Taslak Oluşturma: Sadece anahtar kelimeler sağlayın ve AI'nın gerisini halletmesine izin verin; birden fazla yazım stiliyle.
- Akıllı Genişletmeler: Bağlam farkındalığına sahip önerilerle düşüncelerinizi genişletin.
- Özetleme: Uzun e-postaların kısa ve öz bir özetini anında alın.
- Küresel Kapsam: E-postalarınızı herhangi bir dile kolayca çevirin.
Bu özellik şunları destekler:
- Akıllı e-posta yanıtları
- Optimize edilmiş içerik
- Anahtar kelimeye dayalı taslaklar
- Akıllı içerik genişletme
- E-posta özetleme
- Çok dilli çeviri
En önemlisi, bu özellik sonsuza kadar tamamen ücretsiz! Boşuna beklemeyin—şimdi AI Mail Asistanını indirin ve keyfini çıkarın
Microsoft Outlook'a kategorileri içe aktarma
Microsoft Outlook'unuza renk kategorilerini içe aktarmadan önce, renk kategorileri içeren bir notun .msg dosyası gereklidir.
Adım 1: Gezinti Bölmesi'ndeki Not'a tıklayarak Not görünümüne geçin.
Adım 2: Renk kategorileri içeren notun .msg dosyasını Microsoft Outlook'a sürükleyin.
Adım 3: Gezinti Bölmesi'ndeki Posta'yı tıklayarak Posta görünümüne geçin.
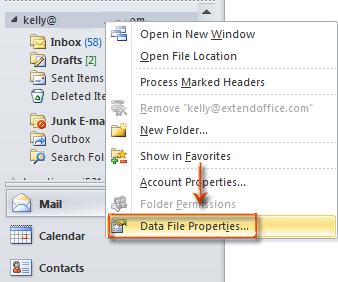
Adım 3: Gezinti Bölmesi'nde bir e-posta hesabı adına sağ tıklayın ve sağ tıklama menüsünden Veri Dosyası Özellikleri'ni seçin.
Adım 4: Klasör Özellikleri iletişim kutusunda, Renk Kategorilerine Yükselt düğmesine tıklayın.
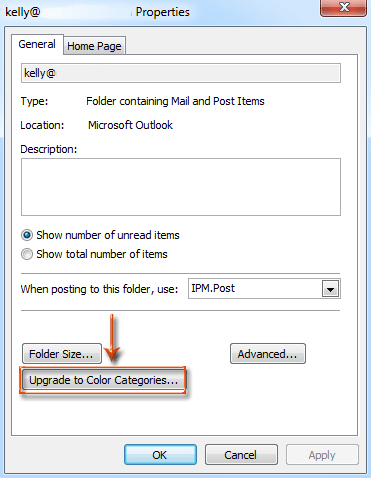
Adım 5: Bir uyarı iletişim kutusu çıkacak ve yalnızca Evet düğmesine tıklayın.

Daha sonra notun .msg dosyasına eklenen tüm renk kategorileri kopyalanır ve Microsoft Outlook'a aktarılır.
Adım 6: Klasör Özellikleri iletişim kutusunda Tamam düğmesine tıklayın.
- E-posta hesap türünüz, Not'u desteklemeyen SMTP ise, örneğin Gmail, bu yöntem kullanılamaz.
- Yapıştırılan not ve e-posta klasörünüz aynı PST veya OST veri dosyasına aitse renk kategorilerini güncelleyebilirsiniz.
En İyi Ofis Verimlilik Araçları
Son Dakika: Kutools for Outlook Ücretsiz Sürümünü Sunmaya Başladı!
Yepyeni Kutools for Outlook ile100'den fazla etkileyici özelliği deneyimleyin! Şimdi indir!
📧 E-posta Otomasyonu: Otomatik Yanıt (POP ve IMAP için kullanılabilir) / E-posta Gönderimini Zamanla / E-posta Gönderirken Kurala Göre Otomatik CC/BCC / Gelişmiş Kurallar ile Otomatik Yönlendirme / Selamlama Ekle / Çoklu Alıcılı E-postaları Otomatik Olarak Bireysel Mesajlara Böl...
📨 E-posta Yönetimi: E-postayı Geri Çağır / Konu veya diğer kriterlere göre dolandırıcılık amaçlı e-postaları engelle / Yinelenen e-postaları sil / Gelişmiş Arama / Klasörleri Düzenle...
📁 Ekler Pro: Toplu Kaydet / Toplu Ayır / Toplu Sıkıştır / Otomatik Kaydet / Otomatik Ayır / Otomatik Sıkıştır...
🌟 Arayüz Büyüsü: 😊 Daha Fazla Şık ve Eğlenceli Emoji / Önemli e-postalar geldiğinde uyarı / Outlook'u kapatmak yerine küçült...
👍 Tek Tıkla Harikalar: Tümüne Eklerle Yanıtla / Kimlik Avı E-postalarına Karşı Koruma / 🕘 Gönderenin Saat Dilimini Göster...
👩🏼🤝👩🏻 Kişiler & Takvim: Seçilen E-postalardan Toplu Kişi Ekle / Bir Kişi Grubunu Bireysel Gruplara Böl / Doğum günü hatırlatıcısını kaldır...
Kutools'u tercih ettiğiniz dilde kullanın – İngilizce, İspanyolca, Almanca, Fransızca, Çince ve40'tan fazla başka dili destekler!


🚀 Tek Tıkla İndir — Tüm Ofis Eklentilerini Edinin
Şiddetle Tavsiye Edilen: Kutools for Office (5'i1 arada)
Tek tıkla beş kurulum paketini birden indirin — Kutools for Excel, Outlook, Word, PowerPoint ve Office Tab Pro. Şimdi indir!
- ✅ Tek tık kolaylığı: Beş kurulum paketinin hepsini tek seferde indirin.
- 🚀 Her türlü Ofis görevi için hazır: İhtiyacınız olan eklentileri istediğiniz zaman yükleyin.
- 🧰 Dahil olanlar: Kutools for Excel / Kutools for Outlook / Kutools for Word / Office Tab Pro / Kutools for PowerPoint