Outlook: gönderilen öğelerin saklandığı klasörü değiştirin
Outlook'ta, gönderilen e-posta mesajları genellikle otomatik olarak Gönderilen Öğeler klasörüne kaydedilir. Ancak bu mesajları daha düzenli veya verimli bir şekilde farklı bir klasörde saklamak isteyebilirsiniz. Bu kılavuz, size varsayılan Gönderilen Öğeler klasörünü değiştirmek için basit yöntemler gösterecek ve Microsoft Outlook'ta gönderdiğiniz e-postaları kolayca başka klasörlere yönlendirmenizi sağlayacak.
Mesaj yazarken gönderilen öğelerin saklandığı klasörü değiştirin
Tüm gönderilen öğelerin otomatik olarak saklandığı klasörü değiştirin
Mesaj yazarken gönderilen öğelerin saklandığı klasörü değiştirin
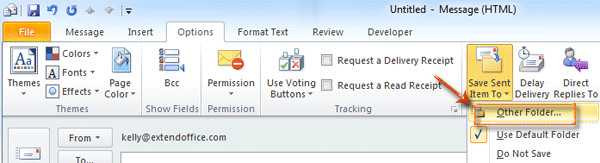
Bir e-posta mesajı yazarken, bu gönderme işleminin gönderildikten sonra saklanacağı alternatif bir klasör belirleyebilirsiniz.
Adım 1: Mesaj Penceresindeki Seçenekler sekmesindeki Daha Fazla Seçenekler grubunda Kaydedilen Gönderilen Öğe'yi > Diğer Klasör'e tıklayın.
Adım 2: Klasör Seçimi iletişim kutusunda, Klasörler: kutusunda bir klasör seçip vurgulayın ve Tamam düğmesine tıklayın.
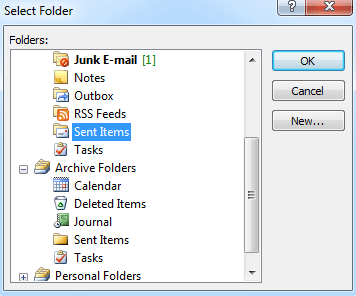
Bu e-posta mesajını gönderdikten sonra, kopyası Adım 2'de seçtiğiniz klasöre otomatik olarak kaydedilecektir.
Outlook'daki AI Mail Asistanı: Daha Akıllı Yanıtlar, Daha Açık İletişim (tek tıklama sihirbazlığı!) ÜCRETSİZ
Kutools for Outlook'un AI Mail Asistanı ile günlük Outlook görevlerinizi kolaylaştırın. Bu güçlü araç, geçmiş e-postalarınızdan öğrenerek size akıllı ve doğru yanıtlar sunar, e-posta içeriğinizi optimize eder ve mesaj taslaklarını hazırlamada ve geliştirmede size yardımcı olur.

Bu özellik şunları destekler:
- Akıllı Yanıtlar: Geçmiş konuşmalarınızdan oluşturulan, kişiselleştirilmiş, kesin ve kullanıma hazır yanıtlar alın.
- Geliştirilmiş İçerik: E-posta metniniz otomatik olarak netlik ve etki için iyileştirilir.
- Kolay Taslak Oluşturma: Sadece anahtar kelimeler sağlayın ve AI'nın gerisini halletmesine izin verin; birden fazla yazım stiliyle.
- Akıllı Genişletmeler: Bağlam farkındalığına sahip önerilerle düşüncelerinizi genişletin.
- Özetleme: Uzun e-postaların kısa ve öz bir özetini anında alın.
- Küresel Kapsam: E-postalarınızı herhangi bir dile kolayca çevirin.
Bu özellik şunları destekler:
- Akıllı e-posta yanıtları
- Optimize edilmiş içerik
- Anahtar kelimeye dayalı taslaklar
- Akıllı içerik genişletme
- E-posta özetleme
- Çok dilli çeviri
En önemlisi, bu özellik sonsuza kadar tamamen ücretsiz! Boşuna beklemeyin—şimdi AI Mail Asistanını indirin ve keyfini çıkarın
Tüm gönderilen öğelerin otomatik olarak saklandığı klasörü değiştirin
Bazı durumlarda, varsayılan Gönderilen Öğeler klasörünü değiştirmek ve tüm gönderilen e-posta mesajlarının belirli bir klasöre otomatik olarak kaydedilmesini isteyebilirsiniz. Size Outlook'ta bir kural oluşturarak bunu gerçekleştirmeniz için rehberlik edeceğiz.
Bir kural oluşturmadan önce, Gezinti Bölmesi'ndeki Posta'yı tıklayarak Posta görünümüne geçmeniz gerekir.
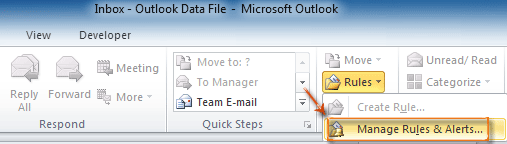
Adım 1: Kurallar ve Uyarılar iletişim kutusunu açın:
Ana sekmedeki Taşı grubunda Kurallar > Kuralları Yönet & Uyarılar'a tıklayın.
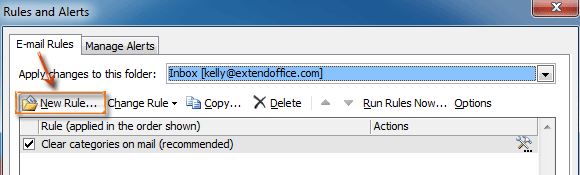
Adım 2: Kurallar ve Uyarılar iletişim kutusunda, E-posta Kuralları sekmesinde Yeni Kural düğmesine tıklayın.
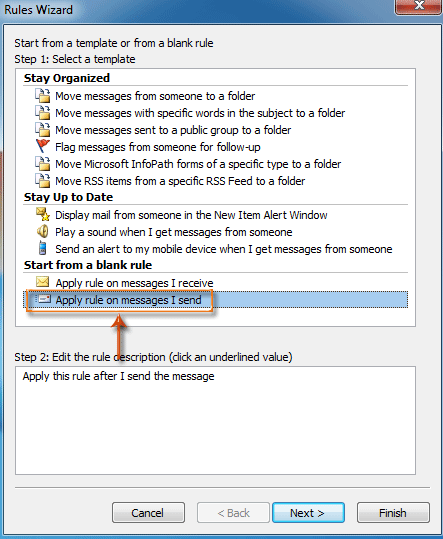
Adım 3: Kural Sihirbazı iletişim kutusunda, Boş bir kural ile başla bölümünde Uygula kuralı bana gönderdiğim mesajlara seçeneğini işaretleyip İleri düğmesine tıklayın.
Adım 4: Yeni Kural Sihirbazı iletişim kutusunda
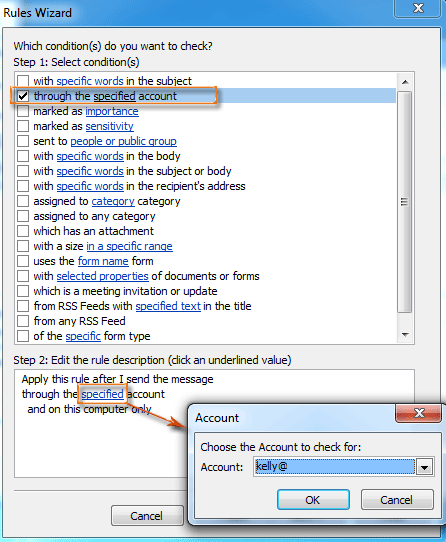
- Adım 1: koşulları seçin bölümünde belirtilen hesap aracılığıyla seçeneğini işaretleyin.
- Adım 2: Kural açıklamasını düzenle bölümünde belirtilen seçeneğine tıklayın.
- Açılan Hesap iletişim kutusunda, Hesap: kutusunda bir hesap seçin ve Tamam düğmesine tıklayın.
- İleri düğmesine tıklayın.
Adım 5: Yeni Kural Sihirbazı iletişim kutusunda
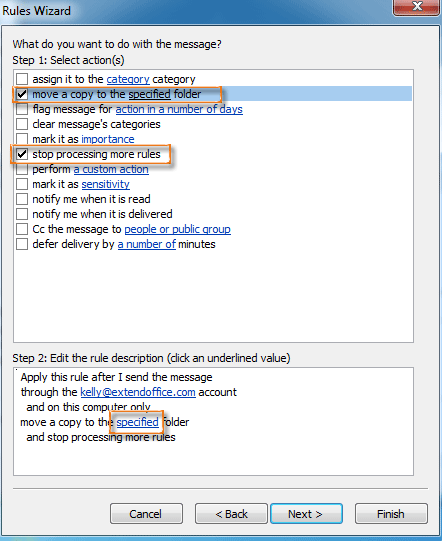
- Adım 1: eylemleri seçin bölümünde bir kopyasını belirtilen klasöre taşı seçeneğini ve daha fazla kural işleme durdur seçeneğini işaretleyin.
- Adım 2: Kural açıklamasını düzenle bölümünde belirtilen seçeneğine tıklayın.
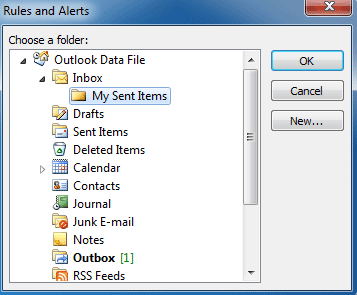
- Kurallar ve Uyarılar iletişim kutusunda bir klasör seçin ve Tamam düğmesine tıklayın.
- İleri düğmesine tıklayın.
Adım 6: Sonraki iletişim kutularında İleri düğmelerine ve Son düğmesine tıklayarak devam edin.
Şu andan itibaren tüm gönderilen e-posta mesajları, Adım 5'te yapılandırdığınız klasöre otomatik olarak kaydedilecektir.
En İyi Ofis Verimlilik Araçları
Son Dakika: Kutools for Outlook Ücretsiz Sürümünü Sunmaya Başladı!
Yepyeni Kutools for Outlook ile100'den fazla etkileyici özelliği deneyimleyin! Şimdi indir!
📧 E-posta Otomasyonu: Otomatik Yanıt (POP ve IMAP için kullanılabilir) / E-posta Gönderimini Zamanla / E-posta Gönderirken Kurala Göre Otomatik CC/BCC / Gelişmiş Kurallar ile Otomatik Yönlendirme / Selamlama Ekle / Çoklu Alıcılı E-postaları Otomatik Olarak Bireysel Mesajlara Böl...
📨 E-posta Yönetimi: E-postayı Geri Çağır / Konu veya diğer kriterlere göre dolandırıcılık amaçlı e-postaları engelle / Yinelenen e-postaları sil / Gelişmiş Arama / Klasörleri Düzenle...
📁 Ekler Pro: Toplu Kaydet / Toplu Ayır / Toplu Sıkıştır / Otomatik Kaydet / Otomatik Ayır / Otomatik Sıkıştır...
🌟 Arayüz Büyüsü: 😊 Daha Fazla Şık ve Eğlenceli Emoji / Önemli e-postalar geldiğinde uyarı / Outlook'u kapatmak yerine küçült...
👍 Tek Tıkla Harikalar: Tümüne Eklerle Yanıtla / Kimlik Avı E-postalarına Karşı Koruma / 🕘 Gönderenin Saat Dilimini Göster...
👩🏼🤝👩🏻 Kişiler & Takvim: Seçilen E-postalardan Toplu Kişi Ekle / Bir Kişi Grubunu Bireysel Gruplara Böl / Doğum günü hatırlatıcısını kaldır...
Kutools'u tercih ettiğiniz dilde kullanın – İngilizce, İspanyolca, Almanca, Fransızca, Çince ve40'tan fazla başka dili destekler!


🚀 Tek Tıkla İndir — Tüm Ofis Eklentilerini Edinin
Şiddetle Tavsiye Edilen: Kutools for Office (5'i1 arada)
Tek tıkla beş kurulum paketini birden indirin — Kutools for Excel, Outlook, Word, PowerPoint ve Office Tab Pro. Şimdi indir!
- ✅ Tek tık kolaylığı: Beş kurulum paketinin hepsini tek seferde indirin.
- 🚀 Her türlü Ofis görevi için hazır: İhtiyacınız olan eklentileri istediğiniz zaman yükleyin.
- 🧰 Dahil olanlar: Kutools for Excel / Kutools for Outlook / Kutools for Word / Office Tab Pro / Kutools for PowerPoint