Outlook'ta tek/çoklu e-postalardaki tüm ekleri nasıl yazdırabiliriz?
Bildiğiniz gibi, Microsoft Outlook'ta Dosya > Yazdır'a tıkladığınızda yalnızca e-posta içeriği (başlık, içerik vb.) yazdırılır, ancak ekler yazdırılmaz. Burada size Microsoft Outlook'ta seçilen bir e-postadaki tüm ekleri kolayca yazdırma yöntemini göstereceğiz.
- Tek bir e-posta mesajındaki tüm ekleri teker teker yazdırma
- Tek bir e-posta mesajındaki tüm ekleri toplu olarak yazdırma
- Birden fazla seçili e-postadaki tüm ekleri ve resimleri toplu olarak yazdırma
- Gövdedeki resimler hariç birden fazla seçili e-postadaki tüm ekleri toplu olarak yazdırma
Tek bir e-posta mesajındaki tüm ekleri teker teker yazdırma
Microsoft Outlook bize Quick Print özelliğini sunar, bu da size bir e-posta mesajındaki ekleri teker teker yazdırmaya yardımcı olabilir.
1. Daha sonra eklerini yazdıracağınız e-posta mesajını seçin.
2. Bu e-postadaki bir eke tıklayın.

3. Ekler sekmesindeki Eylemler grubunda Hızlı Yazdır düğmesine tıklayın.
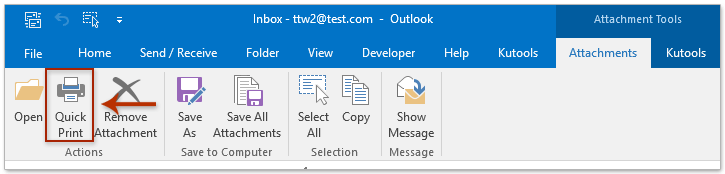
Not: Ek Araçları e-postalardaki eklere tıklayana kadar etkinleştirilmeyecektir.
4. Bir Posta Eki Açma iletişim kutusu çıkacak ve Lütfen Aç düğmesine tıklayın.
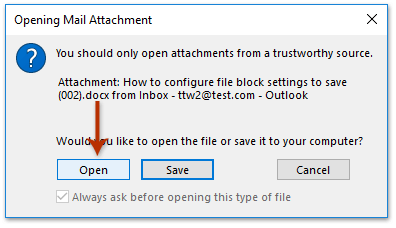
Lütfen unutmayın ki bu adım seçilen eki açacak ve aynı anda bu seçili eki yazdıracaktır.
Bu e-postadaki diğer ekleri yazdırmak için lütfen 2. Adım'dan 4. Adım'a kadar olan adımları tekrarlayın.
Outlook'ta birden fazla e-postadan tüm ekleri hızlıca kaydetme/dışa aktarma
Normalde bir e-postadan ekleri kaydetmek için Ek Araçlarını etkinleştirip Outlook'taki Tüm Ekleri Kaydet özelliğini kullanabiliriz. Peki ya birden fazla e-postadan veya Outlook'taki tüm posta klasöründen ekleri kaydetmek istersek? Kutools for Outlook'un Tümünü Kaydet (Ekler) özelliğini deneyin.
Tek bir e-posta mesajındaki tüm ekleri toplu olarak yazdırma
Eğer bir e-posta mesajında birçok ek varsa, bunları teker teker yazdırmak zaman alıcı olacaktır. Aşağıdaki yöntem ise size seçili bir e-posta mesajındaki tüm ekleri kolayca toplu olarak yazdırma yolunu gösterecektir.
1. Daha sonra eklerini yazdıracağınız e-posta mesajını seçin.
2. Outlook 2010 veya daha yeni sürümlerde, lütfen Dosya > Yazdır > Yazdırma Seçenekleri'ne tıklayın. Aşağıdaki ekran görüntüsüne bakın:
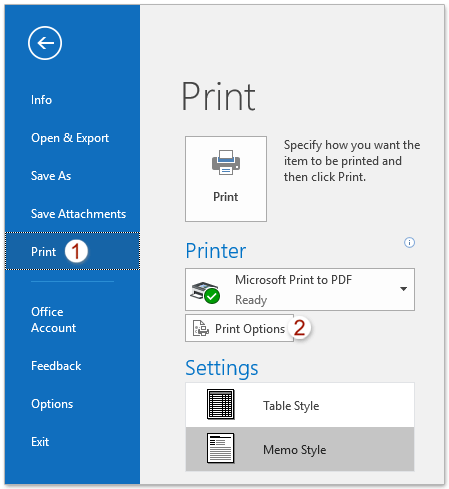
3. Yazdırma iletişim kutusunda, lütfen Yazdırma seçenekleri bölümünde Ek dosyaları yazdır seçeneğini işaretleyin. Ekler yalnızca varsayılan yazıcıya yazdırılacaktır.
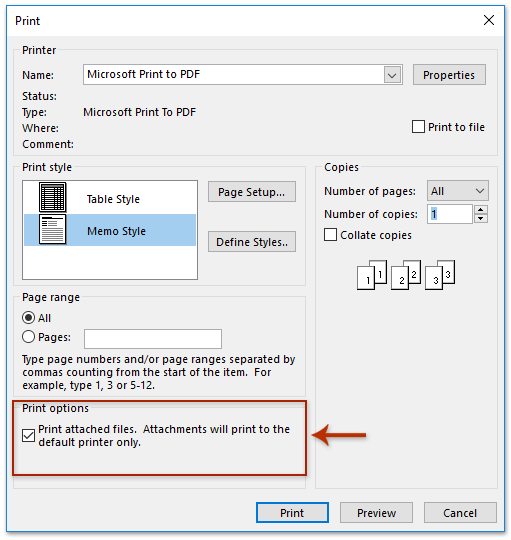
4. Yazdır düğmesine tıklayın.
5. Açılan Posta Eki Açma iletişim kutusunda, devam etmek için lütfen Aç düğmesine tıklayın. (Not: Bu iletişim kutusu her eke ayrı ayrı açılacaktır.)
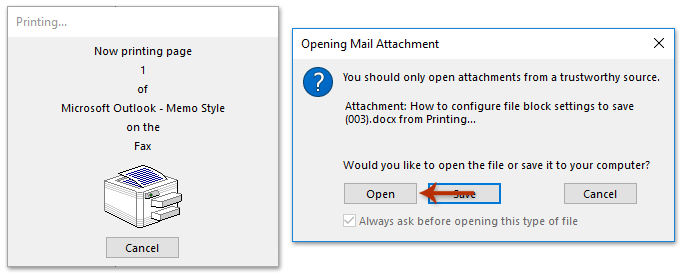
Şimdi bu seçili e-posta mesajındaki tüm ekler bir seferde yazdırılacaktır.
Birden fazla seçili e-postadaki tüm ekleri ve resimleri toplu olarak yazdırma
Outlook'ta birden fazla e-postadaki tüm ekleri ve ileti gövdesindeki tüm resimleri yazdırmak için lütfen aşağıdaki adımları izleyerek bir VBA kodu uygulayın.
1. Posta listesinde, yazdırmak istediğiniz eklerin bulunduğu birden fazla e-postayı seçmek için Ctrl veya Shift tuşlarını basılı tutun.
2. Microsoft Visual Basic for Applications penceresini açmak için Alt + F11 tuşlarına birlikte basın.
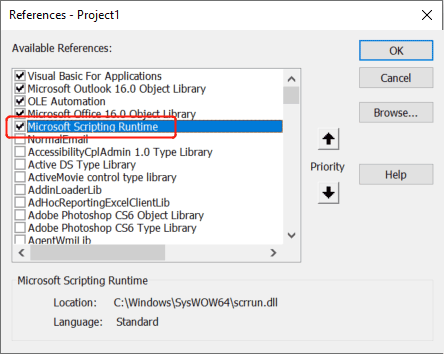
3. Microsoft Visual Basic for Applications penceresinde Araçlar > Referanslar'a tıklayın. Ve ardından aşağıda gösterildiği gibi Microsoft Scripting Runtime seçeneğini işaretleyin. İşlem tamamlandığında Tamam'a tıklayın.
4. Ekle Insert > Module'e tıklayın ve ardından aşağıdaki VBA kodunu yeni modül penceresine yapıştırın.
VBA: Birden fazla Outlook e-postasındaki tüm ekleri yazdırma
Sub PrintAllAttachmentsInMultipleMails()
  'Update by ExtendOffice 2022/08/03
  Dim xShellApp As Object
  Dim xFSO As Scripting.FileSystemObject
  Dim xItem As Object
  Dim xTempFldPath, xFilePath As String
  Dim xSelItems As Outlook.Selection
  Dim xMailItem As Outlook.MailItem
  Dim xAttachments As Outlook.Attachments
  Dim xAttachment As Outlook.Attachment
  Dim xFile As File
  On Error Resume Next
  Set xFSO = New Scripting.FileSystemObject
  xTempFldPath = xFSO.GetSpecialFolder(2).Path & "\Attachments " & Format(Now, "yyyymmddhhmmss") 'xFSO.GetSpecialFolder(2) For saving temporary files
  If xFSO.FolderExists(xTemfldpath) = False Then 'create temporary folder
    xFSO.CreateFolder (xTempFldPath)
  End If
  Set xSelItems = Outlook.ActiveExplorer.Selection
  Set xShellApp = CreateObject("Shell.Application")
  For Each xItem In xSelItems
    If xItem.Class = OlObjectClass.olMail Then
      Set xMailItem = xItem
      Set xAttachments = xMailItem.Attachments
      For Each xAttachment In xAttachments
        xFilePath = xTempFldPath & "\" & xAttachment.FileName
        xAttachment.SaveAsFile (xFilePath)
      Next
    End If
  Next
  For Each xFile In xFSO.GetFolder(xTempFldPath).Files
    VBA.DoEvents
    Call xShellApp.ShellExecute(xFile.Path, "", "", "print", 0)
  Next
  Set xSelItems = Nothing
  Set xShellApp = Nothing
  Set xFSO = Nothing
End Sub
5. Bu VBA kodunu çalıştırmak için F5 tuşuna basın veya Çalıştır düğmesine tıklayın. Şimdi seçili e-postalardaki tüm eklerin ve ileti gövdesindeki resimlerin yazdırıldığını göreceksiniz.
Not:
- Her bir resim, yazdırma onayınızı istemek için bir açılır iletişim kutusu getirecektir. Diğer dosya türleri ise doğrudan yazdırılacaktır.
- Bir e-posta imzasında bulunan resimler de açılır iletişim kutuları getirecektir.
- Bu projedeki makrolar devre dışı bırakıldı hatası alırsanız, lütfen bu öğreticiye bakın: Outlook'ta Makroları Nasıl Etkinleştirip Devre Dışı Bırakabilirim?
Gövdedeki resimler hariç birden fazla seçili e-postadaki tüm ekleri toplu olarak yazdırma
Outlook'ta yalnızca birden fazla e-postadaki ekleri yazdırmak, ancak ileti gövdesindeki resimleri yazdırmamak için lütfen aşağıdaki adımları izleyerek bir VBA kodu uygulayın.
1. Posta listesinde, yazdırmak istediğiniz eklerin bulunduğu birden fazla e-postayı seçmek için Ctrl veya Shift tuşlarını basılı tutun.
2. Microsoft Visual Basic for Applications penceresini açmak için Alt + F11 tuşlarına birlikte basın.
3. Microsoft Visual Basic for Applications penceresinde Araçlar > Referanslar'a tıklayın. Ve ardından aşağıda gösterildiği gibi Microsoft Scripting Runtime seçeneğini işaretleyin. İşlem tamamlandığında Tamam'a tıklayın.
4. Ekle Insert > Module'e tıklayın ve ardından aşağıdaki VBA kodunu yeni modül penceresine yapıştırın.
VBA: Birden fazla Outlook e-postasındaki tüm ekleri yazdırma
Sub PrintAllAttachmentsInMultipleMails()
  'Update by ExtendOffice 2022/08/05
  Dim xShellApp As Object
  Dim xFSO As Scripting.FileSystemObject
  Dim xItem As Object
  Dim xTempFldPath, xFilePath As String
  Dim xSelItems As Outlook.Selection
  Dim xMailItem As Outlook.MailItem
  Dim xAttachments As Outlook.Attachments
  Dim xAttachment As Outlook.Attachment
  Dim xFile As File
  On Error Resume Next
  Set xFSO = New Scripting.FileSystemObject
  xTempFldPath = xFSO.GetSpecialFolder(2).Path & "\Attachments " & Format(Now, "yyyymmddhhmmss") 'xFSO.GetSpecialFolder(2) For saving temporary files
  If xFSO.FolderExists(xTemfldpath) = False Then 'create temporary folder
    xFSO.CreateFolder (xTempFldPath)
  End If
  Set xSelItems = Outlook.ActiveExplorer.Selection
  Set xShellApp = CreateObject("Shell.Application")
  For Each xItem In xSelItems
    If xItem.Class = OlObjectClass.olMail Then
      Set xMailItem = xItem
      Set xAttachments = xMailItem.Attachments
      For Each xAttachment In xAttachments
        If IsEmbeddedAttachment(xAttachment) = False Then
          xFilePath = xTempFldPath & "\" & xAttachment.FileName
          xAttachment.SaveAsFile (xFilePath)
          Debug.Print xFilePath
        End If
      Next
    End If
  Next
  For Each xFile In xFSO.GetFolder(xTempFldPath).Files
    VBA.DoEvents
    Call xShellApp.ShellExecute(xFile.Path, "", "", "print", 0)
  Next
  Set xSelItems = Nothing
  Set xShellApp = Nothing
  Set xFSO = Nothing
End Sub

Function IsEmbeddedAttachment(Attach As Attachment)
Dim xItem As MailItem
Dim xCid As String
Dim xID As String
Dim xHtml As String
On Error Resume Next
IsEmbeddedAttachment = False
Set xItem = Attach.Parent
If xItem.BodyFormat <> olFormatHTML Then Exit Function
xCid = ""
xCid = Attach.PropertyAccessor.GetProperty("http://schemas.microsoft.com/mapi/proptag/0x3712001F")
If xCid <> "" Then
    xHtml = xItem.HTMLBody
    xID = "cid:" & xCid
    If InStr(xHtml, xID) > 0 Then
        IsEmbeddedAttachment = True
    End If
End If
End Function
5. Bu VBA kodunu çalıştırmak için F5 tuşuna basın veya Çalıştır düğmesine tıklayın. Şimdi seçili e-postalardaki tüm eklerin yazdırıldığını göreceksiniz.
Not:
- Her bir ekli resim, yazdırma onayınızı istemek için bir açılır iletişim kutusu getirecektir. Diğer dosya türleri ise doğrudan yazdırılacaktır.
- İleti gövdesindeki resimler yazdırılmayacaktır.
- Bu projedeki makrolar devre dışı bırakıldı hatası alırsanız, lütfen bu öğreticiye bakın: Outlook'ta Makroları Nasıl Etkinleştirip Devre Dışı Bırakabilirim?
Demo: Bir Outlook e-postasındaki bir veya tüm ekleri yazdırma
En İyi Ofis Verimlilik Araçları
Son Dakika: Kutools for Outlook Ücretsiz Sürümünü Sunmaya Başladı!
Yepyeni Kutools for Outlook ile100'den fazla etkileyici özelliği deneyimleyin! Şimdi indir!
📧 E-posta Otomasyonu: Otomatik Yanıt (POP ve IMAP için kullanılabilir) / E-posta Gönderimini Zamanla / E-posta Gönderirken Kurala Göre Otomatik CC/BCC / Gelişmiş Kurallar ile Otomatik Yönlendirme / Selamlama Ekle / Çoklu Alıcılı E-postaları Otomatik Olarak Bireysel Mesajlara Böl...
📨 E-posta Yönetimi: E-postayı Geri Çağır / Konu veya diğer kriterlere göre dolandırıcılık amaçlı e-postaları engelle / Yinelenen e-postaları sil / Gelişmiş Arama / Klasörleri Düzenle...
📁 Ekler Pro: Toplu Kaydet / Toplu Ayır / Toplu Sıkıştır / Otomatik Kaydet / Otomatik Ayır / Otomatik Sıkıştır...
🌟 Arayüz Büyüsü: 😊 Daha Fazla Şık ve Eğlenceli Emoji / Önemli e-postalar geldiğinde uyarı / Outlook'u kapatmak yerine küçült...
👍 Tek Tıkla Harikalar: Tümüne Eklerle Yanıtla / Kimlik Avı E-postalarına Karşı Koruma / 🕘 Gönderenin Saat Dilimini Göster...
👩🏼🤝👩🏻 Kişiler & Takvim: Seçilen E-postalardan Toplu Kişi Ekle / Bir Kişi Grubunu Bireysel Gruplara Böl / Doğum günü hatırlatıcısını kaldır...
Kutools'u tercih ettiğiniz dilde kullanın – İngilizce, İspanyolca, Almanca, Fransızca, Çince ve40'tan fazla başka dili destekler!


🚀 Tek Tıkla İndir — Tüm Ofis Eklentilerini Edinin
Şiddetle Tavsiye Edilen: Kutools for Office (5'i1 arada)
Tek tıkla beş kurulum paketini birden indirin — Kutools for Excel, Outlook, Word, PowerPoint ve Office Tab Pro. Şimdi indir!
- ✅ Tek tık kolaylığı: Beş kurulum paketinin hepsini tek seferde indirin.
- 🚀 Her türlü Ofis görevi için hazır: İhtiyacınız olan eklentileri istediğiniz zaman yükleyin.
- 🧰 Dahil olanlar: Kutools for Excel / Kutools for Outlook / Kutools for Word / Office Tab Pro / Kutools for PowerPoint