Outlook'ta alınan mesajların konu satırlarını nasıl değiştirebilir/düzenleyebilirim?
Kolay arama yapmak, mesaj içeriğiyle tutarlı olmak veya diğer amaçlar için Outlook'ta alınan bazı mesajların konularını düzenlemeniz veya değiştirmeniz gerekebilir. Ancak, bu konuların düzenlenebileceği veya değiştirilebileceği bir yer görünmüyor. Aslında Microsoft Outlook bu özelliği desteklemekte ve burada size alınan mesajların konularını kolayca düzenlemenizi sağlayacak rehberlik edeceğiz.
Outlook'ta tek bir e-postanın konu satırını değiştirin/düzenleyin
Outlook'ta birden fazla e-postanın konu satırlarını değiştirin/düzenleyin
- Yapay zeka teknolojisiyle e-posta üretkenliğinizi artırın, size hızlı cevap verme, yeni taslaklar oluşturma, mesajları çevirme ve daha fazlasını daha verimli bir şekilde yapma imkanı sağlar.
- Otomatik CC/BCC, kurallara göre Otomatik Yönlendirme ile e-posta göndermeyi otomatikleştirin; Exchange sunucusu gerektirmeden Otomatik Yanıt (Dışarıda) gönderin...
- BCCde olduğunuzda tümünü yanıtla seçeneğini kullandığınızda BCC Uyarısı veya unutulmuş ekler için Eklenti Hatırlatma gibi hatırlatıcılar alın...
- Ekleri İçeren Tümünü Yanıtla, Selamlama veya Tarih & Saat Bilgisini Otomatik Ekleme veya Konu, Birden Fazla E-postayı Yanıtlama gibi özelliklerle e-posta verimliliğini artırın...
- E-postaları geri çağırma, Ek Araçları (Tüm Ekleri Sıkıştır, Tüm Ekleri Otomatik Kaydet...), Yinelenenleri Kaldır ve Hızlı Rapor ile e-posta işlemlerini akıcı hale getirin...
Outlook'ta tek bir e-postanın konu satırını değiştirin/düzenleyin
Aşağıdaki adımlar, Outlook'ta bir e-postanın konu satırını hızlı bir şekilde değiştirmenize veya düzenlemenize rehberlik edecektir. Lütfen şu adımları izleyin:
1. Posta görünümünde, konu satırını değiştireceğiniz e-postayı çift tıklayarak açın.
2. Şimdi e-posta Mesaj penceresinde açılıyor. Lütfen mesaj başlığının sağ alt köşesindeki ![]() düğmesine tıklayarak mesaj başlığını genişletin. Ekran görüntüsüne bakın:
düğmesine tıklayarak mesaj başlığını genişletin. Ekran görüntüsüne bakın:
Not: Outlook 2010 veya daha eski sürümlerde, mesaj başlığı varsayılan olarak genişletilmiştir, lütfen bu adımı atlayın.
.
3. Şimdi mesaj başlığı genişletildi. Lütfen konu satırını doğrudan düzenleyin ve ardından Kaydet düğmesine tıklayın. Ekran görüntüsüne bakın:

Şimdiye kadar, belirli bir e-postanın konu satırını değiştirdiniz/düzenlediniz. İhtiyaç duyduğunuz şekilde Mesaj penceresini kapatın.
Outlook'ta birden fazla e-postanın konu satırlarını değiştirin/düzenleyin
Eğer Outlook'ta birden fazla e-postanın konu satırlarını değiştirmeniz gerekiyorsa, yukarıdaki yöntem biraz yorucu olabilir. Burada, bu yöntem size klasörün görünüm ayarını değiştirmenizi ve Mesaj Listesi'nde doğrudan e-postaların konu satırlarını düzenlemenizi sağlayacak. Lütfen şu adımları izleyin:
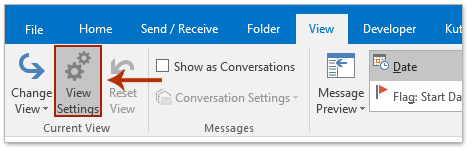
1. Posta görünümünde, konu satırlarını değiştireceğiniz e-postaları içeren klasörü açın ve Görünüm > Görünüm Ayarları'na tıklayın. Ekran görüntüsüne bakın:
2. Şimdi Gelişmiş Görünüm Ayarları iletişim kutusu açılıyor, lütfen Diğer Ayarlar düğmesine tıklayın. Ekran görüntüsüne bakın:

3. Açılan Diğer Ayarlar iletişim kutusunda, lütfen Hücre içi düzenleme seçeneğini işaretleyin ve ardından her iki iletişim kutusunu da kapatmak için sırasıyla Tamam düğmelerine tıklayın.

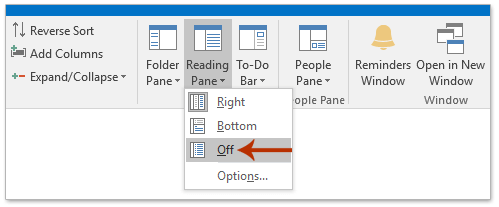
4. Şimdi klasöre geri döndünüz, lütfen Görünüm > Okuma Bölmesi > Kapalı 'ya tıklayarak okuma bölmesini kapatın. Ekran görüntüsüne bakın:
5. Şimdi Mesaj Listesi'nde, değiştirmek istediğiniz konu satırına tıklayın ve aşağıdaki ekran görüntüsünde gösterildiği gibi doğrudan düzenleyin.
Ve ardından bu adımı tekrarlayarak ihtiyacınız olan birden fazla e-postanın konu satırlarını düzenleyin.

En İyi Ofis Verimlilik Araçları
Son Dakika: Kutools for Outlook Ücretsiz Sürümünü Sunmaya Başladı!
Yepyeni Kutools for Outlook ile100'den fazla etkileyici özelliği deneyimleyin! Şimdi indir!
📧 E-posta Otomasyonu: Otomatik Yanıt (POP ve IMAP için kullanılabilir) / E-posta Gönderimini Zamanla / E-posta Gönderirken Kurala Göre Otomatik CC/BCC / Gelişmiş Kurallar ile Otomatik Yönlendirme / Selamlama Ekle / Çoklu Alıcılı E-postaları Otomatik Olarak Bireysel Mesajlara Böl...
📨 E-posta Yönetimi: E-postayı Geri Çağır / Konu veya diğer kriterlere göre dolandırıcılık amaçlı e-postaları engelle / Yinelenen e-postaları sil / Gelişmiş Arama / Klasörleri Düzenle...
📁 Ekler Pro: Toplu Kaydet / Toplu Ayır / Toplu Sıkıştır / Otomatik Kaydet / Otomatik Ayır / Otomatik Sıkıştır...
🌟 Arayüz Büyüsü: 😊 Daha Fazla Şık ve Eğlenceli Emoji / Önemli e-postalar geldiğinde uyarı / Outlook'u kapatmak yerine küçült...
👍 Tek Tıkla Harikalar: Tümüne Eklerle Yanıtla / Kimlik Avı E-postalarına Karşı Koruma / 🕘 Gönderenin Saat Dilimini Göster...
👩🏼🤝👩🏻 Kişiler & Takvim: Seçilen E-postalardan Toplu Kişi Ekle / Bir Kişi Grubunu Bireysel Gruplara Böl / Doğum günü hatırlatıcısını kaldır...
Kutools'u tercih ettiğiniz dilde kullanın – İngilizce, İspanyolca, Almanca, Fransızca, Çince ve40'tan fazla başka dili destekler!


🚀 Tek Tıkla İndir — Tüm Ofis Eklentilerini Edinin
Şiddetle Tavsiye Edilen: Kutools for Office (5'i1 arada)
Tek tıkla beş kurulum paketini birden indirin — Kutools for Excel, Outlook, Word, PowerPoint ve Office Tab Pro. Şimdi indir!
- ✅ Tek tık kolaylığı: Beş kurulum paketinin hepsini tek seferde indirin.
- 🚀 Her türlü Ofis görevi için hazır: İhtiyacınız olan eklentileri istediğiniz zaman yükleyin.
- 🧰 Dahil olanlar: Kutools for Excel / Kutools for Outlook / Kutools for Word / Office Tab Pro / Kutools for PowerPoint