Outlook'daki Takvimlerde iş saatleri dışındaki saatleri nasıl gizlersiniz?
Bildiğiniz gibi, Microsoft Outlook, Gün görünümündeki Takvim'de, çalışma saatlerini atamış olsak bile, gece yarısından (12:00 AM) öğlen 11:59'a kadar olan tüm günü gösterir. İş saatleri dışındaki zamanlar çok fazla alan kaplar ve kullanıcıların tam olarak iş saatlerini hızlıca bulmasını zorlaştırır. Ancak, Outlook'ta iş saatleri dışındaki zamanları gizleyemezsiniz. Bu makalede, Microsoft Outlook'daki Takvimlerde renk kullanarak iş saatleri dışı bölgeleri kaplamak için bir geçici çözüm tanıtacağım.
Çalışma saatleri dışındaki zamanların Takvim'den gerçekten gizlenememesi nedeniyle, "geçici çözüm" olarak size günlük yinelenen bir randevu oluşturmayı ve renk kullanarak iş saatleri dışı bölgeleri kaplamayı göstereceğiz. Aşağıdaki adımları izleyebilirsiniz:
Adım 1: Takvim görünümüne geçin ve iş saatleri dışında kalan saatleri gizlemek istediğiniz belirli takvimi açın.
Adım 2: "Görünüm" sekmesindeki "Görünümü Değiştir" > "Takvim" ve ardından "Gün" düğmesine tıklayarak takvimi "Gün" görünümünde gösterin.
 |  |
Not: Outlook 2007'de, "Görünüm" > "Geçerli Görünüm" > "Gün/Hafta/Ay" seçeneğine tıklayabilir ve ardından takvimin üzerindeki "Gün" düğmesine tıklayabilirsiniz.
Adım 3: Yeni bir randevu oluşturun:
- Outlook 2010 ve daha yeni sürümlerde, "Ana Sayfa" sekmesindeki "Yeni Randevu" düğmesine tıklayın;
- Outlook 2007'de, "Dosya" > "Yeni" > "Randevu" seçeneğine tıklayın.
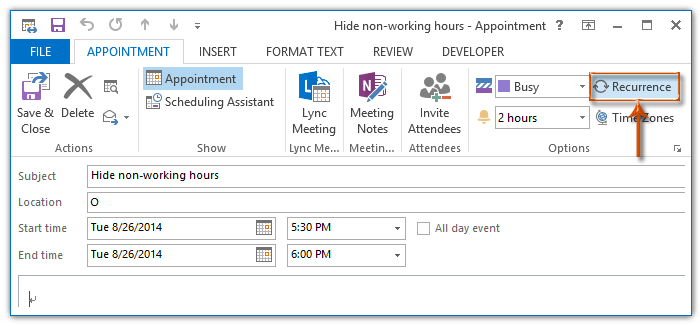
Adım 4: Yeni gelen Randevu penceresinde konuyu ve yeri belirtin ve ardından "Randevu" sekmesindeki "Tekrarlama" düğmesine tıklayın.
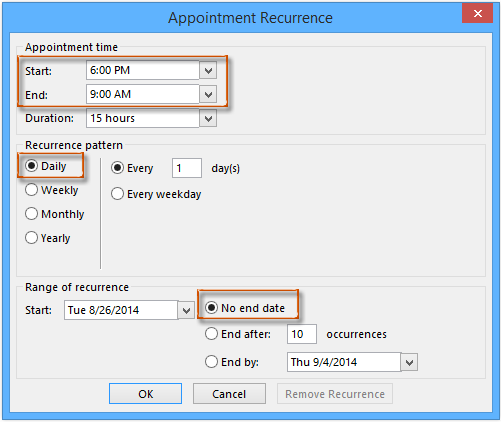
Adım 5: Şimdi Randevu Tekrarlama iletişim kutusunda:
(1) "Başlangıç" kutusuna, her gün işinizin bittiği saati girin, örneğin 18:00 PM;
(2) "Bitiş" kutusuna, her gün işe başladığınız saati girin, örneğin 9:00AM;
(3) "Tekrarlama deseni" bölümünde "Günlük" seçeneğini işaretleyin;
(4) "Tekrarlama aralığı" bölümünde "Bitiş tarihi yok" seçeneğini işaretleyin;
(5) "Tamam" düğmesine tıklayın.
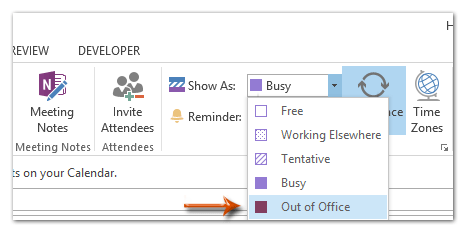
Adım 6: Şimdi Randevu penceresine geri döndünüz, "Randevu" sekmesindeki "Göster İle" kutusuna tıklayın ve açılır listeden "Dışarıda" seçeneğini seçin. Aşağıdaki ekran görüntüsüne bakın:
Adım 7: Bu yeni randevuyu düzenleyin ve "Kaydet ve Kapat" düğmesine tıklayın.
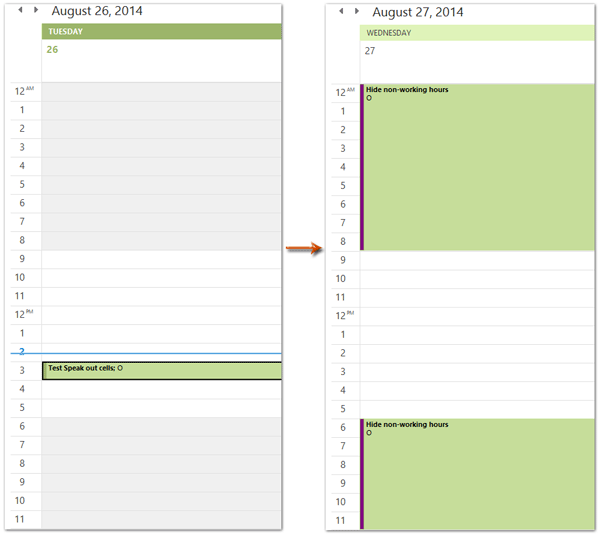
Ardından, yinelenen aralığın ikinci gününden itibaren Takvim'in Gün görünümünde tüm iş saatleri dışındaki saatlerin renk ile kaplı olduğunu göreceksiniz.
En İyi Ofis Verimlilik Araçları
Son Dakika: Kutools for Outlook Ücretsiz Sürümünü Sunmaya Başladı!
Yepyeni Kutools for Outlook ile100'den fazla etkileyici özelliği deneyimleyin! Şimdi indir!
📧 E-posta Otomasyonu: Otomatik Yanıt (POP ve IMAP için kullanılabilir) / E-posta Gönderimini Zamanla / E-posta Gönderirken Kurala Göre Otomatik CC/BCC / Gelişmiş Kurallar ile Otomatik Yönlendirme / Selamlama Ekle / Çoklu Alıcılı E-postaları Otomatik Olarak Bireysel Mesajlara Böl...
📨 E-posta Yönetimi: E-postayı Geri Çağır / Konu veya diğer kriterlere göre dolandırıcılık amaçlı e-postaları engelle / Yinelenen e-postaları sil / Gelişmiş Arama / Klasörleri Düzenle...
📁 Ekler Pro: Toplu Kaydet / Toplu Ayır / Toplu Sıkıştır / Otomatik Kaydet / Otomatik Ayır / Otomatik Sıkıştır...
🌟 Arayüz Büyüsü: 😊 Daha Fazla Şık ve Eğlenceli Emoji / Önemli e-postalar geldiğinde uyarı / Outlook'u kapatmak yerine küçült...
👍 Tek Tıkla Harikalar: Tümüne Eklerle Yanıtla / Kimlik Avı E-postalarına Karşı Koruma / 🕘 Gönderenin Saat Dilimini Göster...
👩🏼🤝👩🏻 Kişiler & Takvim: Seçilen E-postalardan Toplu Kişi Ekle / Bir Kişi Grubunu Bireysel Gruplara Böl / Doğum günü hatırlatıcısını kaldır...
Kutools'u tercih ettiğiniz dilde kullanın – İngilizce, İspanyolca, Almanca, Fransızca, Çince ve40'tan fazla başka dili destekler!


🚀 Tek Tıkla İndir — Tüm Ofis Eklentilerini Edinin
Şiddetle Tavsiye Edilen: Kutools for Office (5'i1 arada)
Tek tıkla beş kurulum paketini birden indirin — Kutools for Excel, Outlook, Word, PowerPoint ve Office Tab Pro. Şimdi indir!
- ✅ Tek tık kolaylığı: Beş kurulum paketinin hepsini tek seferde indirin.
- 🚀 Her türlü Ofis görevi için hazır: İhtiyacınız olan eklentileri istediğiniz zaman yükleyin.
- 🧰 Dahil olanlar: Kutools for Excel / Kutools for Outlook / Kutools for Word / Office Tab Pro / Kutools for PowerPoint