Outlook'ta mail listesinde gönderenlerin alan adını nasıl görüntüleyebilirim?
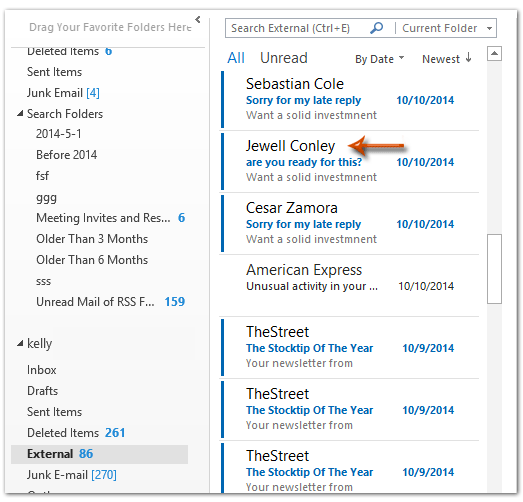
Outlook'ta, mail listesinde yalnızca gönderenlerin görünen adını gösteren garip gönderenlerden gelen e-posta mesajları aldınız mı? Aşağıdaki ekran görüntüsüne bakın. Bazı Outlook kullanıcıları, e-posta mesajlarını açmadan önce gönderenlerin e-posta alanını almanın daha güvenli olacağını düşünebilir. Bu makalede, size Microsoft Outlook'ta mail listesine gönderenlerin e-posta alanlarını nasıl görüntüleyeceğinizi veya göstereceğinizi göstereceğim.
Microsoft Outlook'ta mail listesine gönderenlerin e-posta alanlarını görüntülemek veya göstermek için, bunu elde etmek için aşağıdaki yolları izleyebilirsiniz.
Adım 1: Gönderenlerin e-posta alanlarını görüntüleyeceğiniz veya göstereceğiniz mail klasörünü açın.
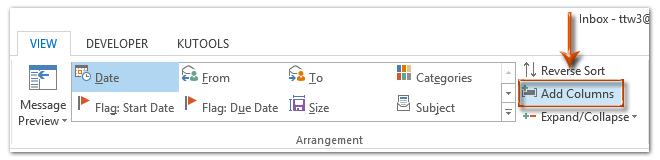
Adım 2: "Görünüm" sekmesindeki "Sütun Ekle" düğmesine tıklayın.
Not: Outlook 2007'de, "Görünüm" > "Geçerli Görünüm" > "Geçerli Görünümü Özelleştir" seçeneğine tıklayabilir ve ardından açılan "Görünümü Özelleştir: Sıkışık" iletişim kutusundaki "Alanlar" düğmesine tıklayabilirsiniz.
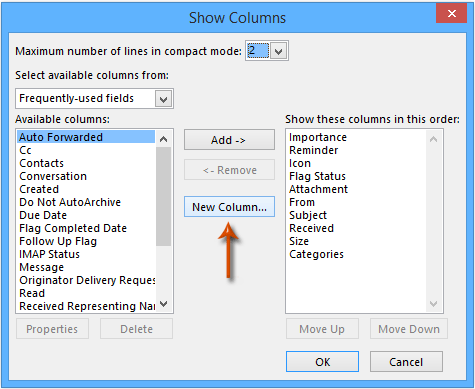
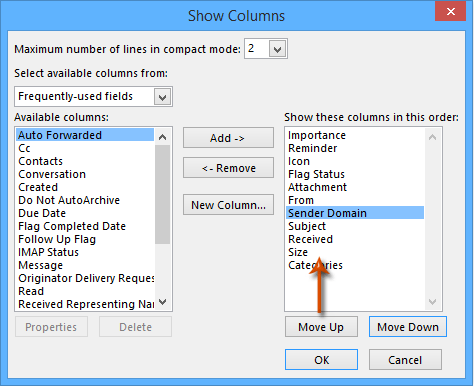
Adım 3: Gelen "Sütunları Göster (veya Alanları Göster)" iletişim kutusunda, "Yeni Sütun" düğmesine (veya "Yeni Alan" düğmesine) tıklayın.
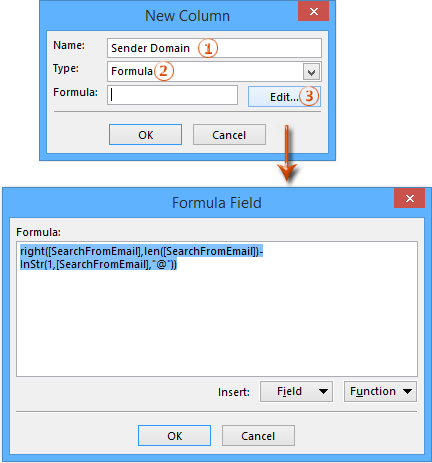
Adım 3: Şimdi "Yeni Sütun (veya Yeni Alan)" iletişim kutusuna girdiniz ve:
(1) "Ad" kutusunda, bu oluşturulan sütun için yeni bir ad girin.
(2) "Tür" kutusuna tıklayın ve açılır listeden "Formül" seçeneğini seçin.
(3) "Düzenle" düğmesine tıklayın ve ardından aşağıdaki metni iletişim kutusunun "Formül" kutusuna girin. Aşağıdaki ekran görüntüsüne bakın:
right([SearchFromEmail],len([SearchFromEmail])-InStr(1,[SearchFromEmail],"@"))
(4) İki iletişim kutusunu da kapatmak için her iki "Tamam" düğmesine de tıklayın.
Adım 4: Şimdi tekrar "Sütunları Göster (veya Alanları Göster)" iletişim kutusuna döndünüz, "Bu sütunları bu sırayla göster" kutusunda yeni oluşturulan sütunu seçin ve "Kimden" altında taşıyın. Aşağıdaki ekran görüntüsüne bakın:
Adım 5: "Tamam" düğmesine (veya düğmelerine) tıklayın.
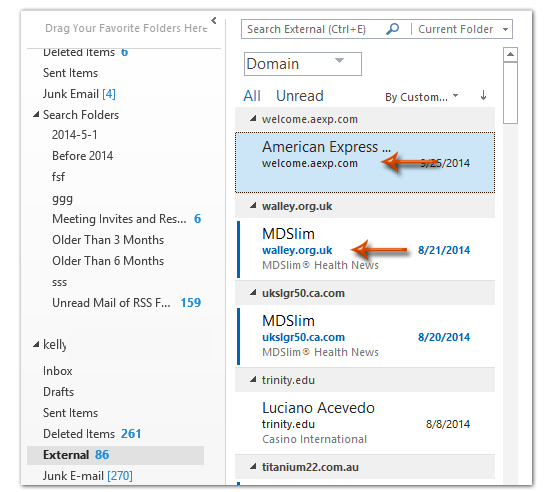
Şimdi her gönderenin e-posta alanı, gönderenin görünen adının altında eklenmiş ve gösterilmiş olarak görülecektir. Aşağıdaki ekran görüntüsüne bakın:
Outlook'ta bu özel görünümü kaydetme yöntemini almak için lütfen Outlook'ta görünüm ayarlarını nasıl kaydedip diğer klasörlere kopyalayabilirim? tıklayın.
İlgili Makale
Outlook'ta gönderen alanına göre nasıl sıralama ve gruplama yapılır?
En İyi Ofis Verimlilik Araçları
Son Dakika: Kutools for Outlook Ücretsiz Sürümünü Sunmaya Başladı!
Yepyeni Kutools for Outlook ile100'den fazla etkileyici özelliği deneyimleyin! Şimdi indir!
📧 E-posta Otomasyonu: Otomatik Yanıt (POP ve IMAP için kullanılabilir) / E-posta Gönderimini Zamanla / E-posta Gönderirken Kurala Göre Otomatik CC/BCC / Gelişmiş Kurallar ile Otomatik Yönlendirme / Selamlama Ekle / Çoklu Alıcılı E-postaları Otomatik Olarak Bireysel Mesajlara Böl...
📨 E-posta Yönetimi: E-postayı Geri Çağır / Konu veya diğer kriterlere göre dolandırıcılık amaçlı e-postaları engelle / Yinelenen e-postaları sil / Gelişmiş Arama / Klasörleri Düzenle...
📁 Ekler Pro: Toplu Kaydet / Toplu Ayır / Toplu Sıkıştır / Otomatik Kaydet / Otomatik Ayır / Otomatik Sıkıştır...
🌟 Arayüz Büyüsü: 😊 Daha Fazla Şık ve Eğlenceli Emoji / Önemli e-postalar geldiğinde uyarı / Outlook'u kapatmak yerine küçült...
👍 Tek Tıkla Harikalar: Tümüne Eklerle Yanıtla / Kimlik Avı E-postalarına Karşı Koruma / 🕘 Gönderenin Saat Dilimini Göster...
👩🏼🤝👩🏻 Kişiler & Takvim: Seçilen E-postalardan Toplu Kişi Ekle / Bir Kişi Grubunu Bireysel Gruplara Böl / Doğum günü hatırlatıcısını kaldır...
Kutools'u tercih ettiğiniz dilde kullanın – İngilizce, İspanyolca, Almanca, Fransızca, Çince ve40'tan fazla başka dili destekler!


🚀 Tek Tıkla İndir — Tüm Ofis Eklentilerini Edinin
Şiddetle Tavsiye Edilen: Kutools for Office (5'i1 arada)
Tek tıkla beş kurulum paketini birden indirin — Kutools for Excel, Outlook, Word, PowerPoint ve Office Tab Pro. Şimdi indir!
- ✅ Tek tık kolaylığı: Beş kurulum paketinin hepsini tek seferde indirin.
- 🚀 Her türlü Ofis görevi için hazır: İhtiyacınız olan eklentileri istediğiniz zaman yükleyin.
- 🧰 Dahil olanlar: Kutools for Excel / Kutools for Outlook / Kutools for Word / Office Tab Pro / Kutools for PowerPoint