Outlook'ta e-postalar geldiğinde ekleri otomatik olarak nasıl yazdırabilirsiniz?
Bu öğretici, size Outlook'a belirli e-postaların eklerini otomatik olarak yazdırmak için yardımcı olmak üzere bir VBA betiği ve bir Outlook kuralını birleştiren bir yöntem göstermektedir.
Belirli e-postalar geldiğinde ekleri otomatik olarak yazdırma
Diyelim ki, belirli bir gönderenden gelen e-postalara ait ekleri otomatik olarak yazdırmak istiyorsunuz. Bunu gerçekleştirmek için aşağıdaki adımları izleyebilirsiniz.
Adım 1: Outlook'ta bir betik oluşturun
Öncelikle, Outlook'ta bir VBA betiği oluşturmanız gerekiyor.
1. Outlook'unuzu açın ve Microsoft Visual Basic for Applications penceresini açmak için Alt + F11 tuşlarına aynı anda basın.
2. Microsoft Visual Basic for Applications penceresinde, Project1 > Microsoft Outlook Objects > ThisOutlookSession öğesine çift tıklayarak ThisOutlookSession (Kod) penceresini açın ve ardından aşağıdaki kodu bu kod penceresine kopyalayın.
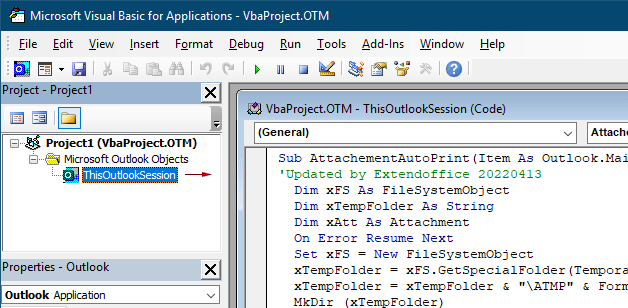
VBA Kodu 1: E-postalar geldiğinde ekleri (tüm türdeki ekler) otomatik olarak yazdırma
Sub AttachementAutoPrint(Item As Outlook.MailItem)
'Updated by Extendoffice 20230223
  Dim xFS As FileSystemObject
  Dim xTempFolder As String
  Dim xAtt As Attachment
  Dim xShell As Object
  Dim xFolder As Object, xFolderItem As Object
  Dim xFileName As String
  On Error GoTo xError
  If Item.Attachments.Count = 0 Then Exit Sub
  Set xFS = New FileSystemObject
  xTempFolder = xFS.GetSpecialFolder(TemporaryFolder)
  xTempFolder = xTempFolder & "\ATMP" & Format(Item.ReceivedTime, "yyyymmddhhmmss")
  If Not xFS.FolderExists(xTempFolder) Then
    MkDir (xTempFolder)
  End If
  Set xShell = CreateObject("Shell.Application")
  Set xFolder = xShell.NameSpace(0)
  For Each xAtt In Item.Attachments
    If IsEmbeddedAttachment(xAtt) = False Then
      xFileName = xTempFolder & "\" & xAtt.FileName
      xAtt.SaveAsFile (xFileName)
      Set xFolderItem = xFolder.ParseName(xFileName)
      xFolderItem.InvokeVerbEx ("print")
    End If
  Next xAtt
  Set xFS = Nothing
  Set xFolder = Nothing
  Set xFolderItem = Nothing
  Set xShell = Nothing
xError:
  If Err <> 0 Then
    MsgBox Err.Number & " - " & Err.Description, , "Kutools for Outlook"
    Err.Clear
  End If
Exit Sub
End Sub

Function IsEmbeddedAttachment(Attach As Attachment)
Dim xItem As MailItem
Dim xCid As String
Dim xID As String
Dim xHtml As String
On Error Resume Next
IsEmbeddedAttachment = False
Set xItem = Attach.Parent
If xItem.BodyFormat <> olFormatHTML Then Exit Function
xCid = ""
xCid = Attach.PropertyAccessor.GetProperty("http://schemas.microsoft.com/mapi/proptag/0x3712001F")
If xCid <> "" Then
    xHtml = xItem.HTMLBody
    xID = "cid:" & xCid
    If InStr(xHtml, xID) > 0 Then
        IsEmbeddedAttachment = True
    End If
End If
End Function
Not: Bu kod, e-postalarda alınan tüm türdeki eklerin yazdırılmasını destekler. Yalnızca belirli bir türdeki ekleri, örneğin pdf dosyalarını yazdırmak istiyorsanız, lütfen aşağıdaki VBA kodunu uygulayın.
VBA Kodu 2: E-postalar geldiğinde belirli türdeki ekleri otomatik olarak yazdırma
Sub AttachementAutoPrint(Item As Outlook.MailItem)
'Updated by Extendoffice 20230223
  Dim xFS As FileSystemObject
  Dim xTempFolder As String
  Dim xAtt As Attachment
  Dim xShell As Object
  Dim xFolder As Object, xFolderItem As Object
  Dim xFileType As String, xFileName As String
  On Error GoTo xError
  If Item.Attachments.Count = 0 Then Exit Sub
  Set xFS = New FileSystemObject
  xTempFolder = xFS.GetSpecialFolder(TemporaryFolder)
  xTempFolder = xTempFolder & "\ATMP" & Format(Item.ReceivedTime, "yyyymmddhhmmss")
  If Not xFS.FolderExists(xTempFolder) Then
    MkDir (xTempFolder)
  End If
  Set xShell = CreateObject("Shell.Application")
  Set xFolder = xShell.NameSpace(0)
  For Each xAtt In Item.Attachments
    If IsEmbeddedAttachment(xAtt) = False Then
      xFileName = xAtt.FileName
      xFileType = LCase$(Right$(xFileName, VBA.Len(xFileName) - VBA.InStrRev(xFileName, ".")))
      xFileName = xTempFolder & "\" & xFileName
      Select Case xFileType
        Case "pdf"   'change "pdf" to the file extension you want to print
          xAtt.SaveAsFile (xFileName)
          Set xFolderItem = xFolder.ParseName(xFileName)
          xFolderItem.InvokeVerbEx ("print")
      End Select
    End If
  Next xAtt
  Set xFS = Nothing
  Set xFolder = Nothing
  Set xFolderItem = Nothing
  Set xShell = Nothing
xError:
  If Err <> 0 Then
    MsgBox Err.Number & " - " & Err.Description, , "Kutools for Outlook"
    Err.Clear
  End If
  Exit Sub
End Sub

Function IsEmbeddedAttachment(Attach As Attachment)
Dim xItem As MailItem
Dim xCid As String
Dim xID As String
Dim xHtml As String
On Error Resume Next
IsEmbeddedAttachment = False
Set xItem = Attach.Parent
If xItem.BodyFormat <> olFormatHTML Then Exit Function
xCid = ""
xCid = Attach.PropertyAccessor.GetProperty("http://schemas.microsoft.com/mapi/proptag/0x3712001F")
If xCid <> "" Then
    xHtml = xItem.HTMLBody
    xID = "cid:" & xCid
    If InStr(xHtml, xID) > 0 Then
        IsEmbeddedAttachment = True
    End If
End If
End Function
Notlar:
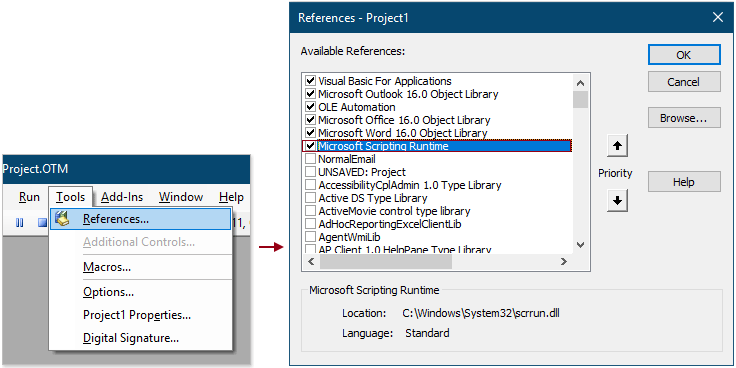
3. Araçlar > Referanslar yolunu izleyin. Açılan References – Project1 iletişim kutusunda, Microsoft Scripting Runtime kutusunu işaretleyin ve ardından Tamam düğmesine tıklayın.
4. Kodu kaydedin ve Microsoft Visual Basic for Applications penceresini kapatmak için Alt + Q tuşlarına basın.
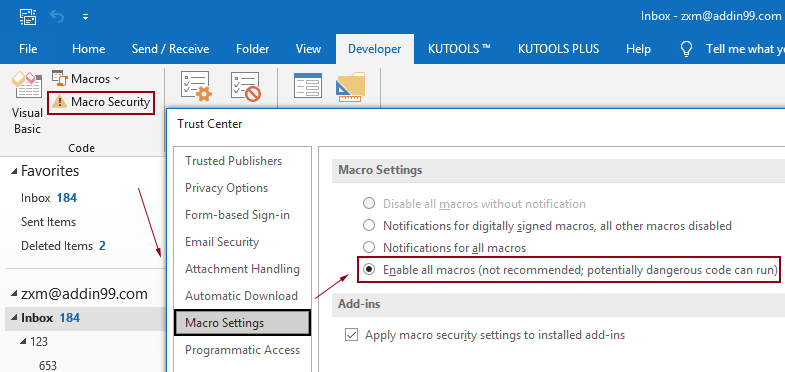
Not: Lütfen Outlook'unuzda Enable all macros seçeneğinin etkinleştirildiğinden emin olun. Bu seçeneği kontrol etmek için aşağıdaki adımları izleyebilirsiniz.
Adım 2: Betiği kullanmak için bir kural oluşturun
Outlook'a VBA betiğini ekledikten sonra, belirli koşullara göre betiği kullanmak için bir kural oluşturmanız gerekmektedir.
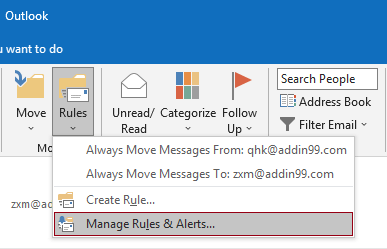
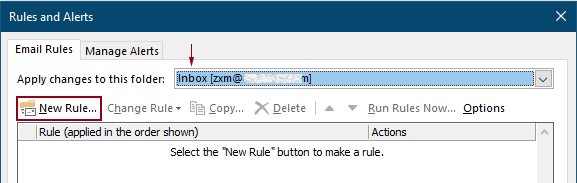
1. Ana sekmesine gidin, Kurallar > Kuralları ve Uyarıları Yönet'e tıklayın.
2. Kurallar ve Uyarılar iletişim kutusunda, bir kural oluşturmak için Yeni Kural düğmesine tıklayın.
İpuçları: Eğer birden fazla e-posta hesabı Outlook'unuza eklediyseniz, lütfen kuralı uygulamak istediğiniz hesabı Değişiklikleri bu klasöre uygula açılır listesinde belirtin. Aksi takdirde, kural şu anda seçili olan e-posta hesabının gelen kutusuna uygulanacaktır.
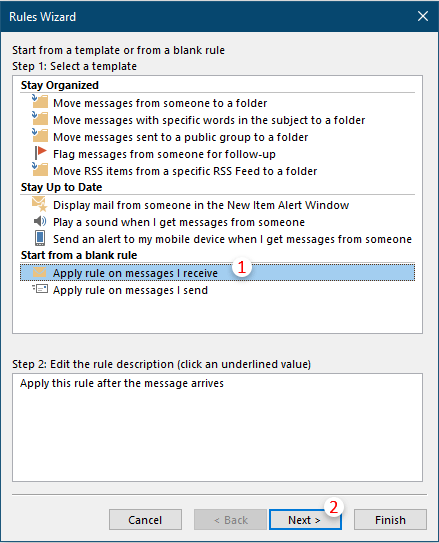
3. İlk Rules Wizard iletişim kutusunda, Adım 1 kutusunda gelen mesajlara kural uygula seçeneğini işaretleyin ve ardından İleri'ye tıklayın.
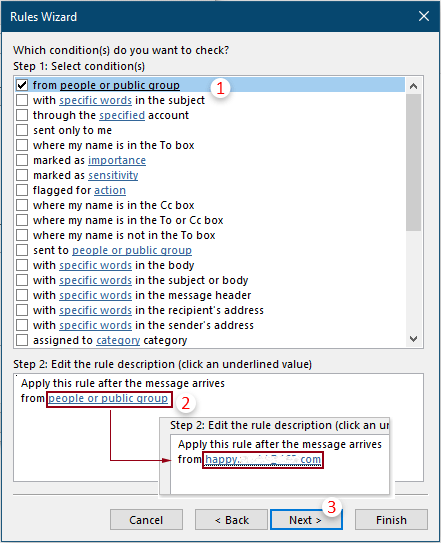
4. İkinci Rules Wizard iletişim kutusunda, şunları yapmanız gerekiyor:
5. Üçüncü Rules Wizard iletişim kutusunda, şunları yapılandırmanız gerekiyor.
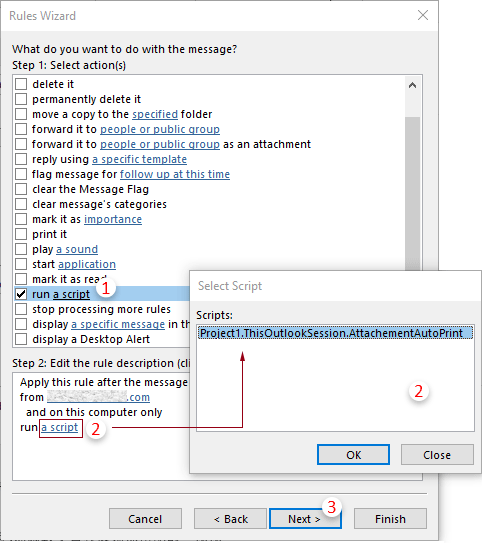
İpuçları: Eğer Rules Wizard'da “bir betik çalıştır” seçeneği eksikse, bu makalede bahsedilen yöntemi izleyerek onu görüntüleyebilirsiniz: Outlook kuralındaki eksik Run A Script seçeneğini geri yükleme.
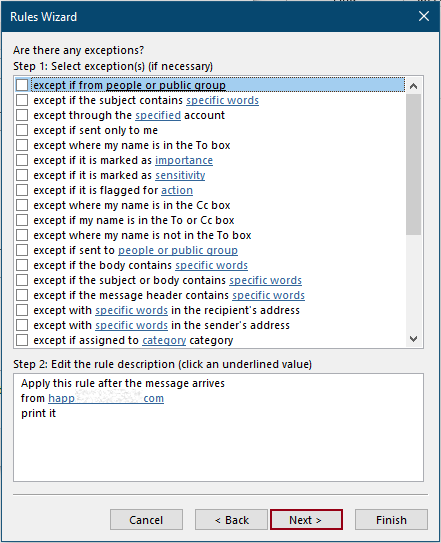
6. Daha sonra başka bir Rules Wizard penceresi açılır ve istisnalar sorar. Gerekirse istisnaları seçebilirsiniz, aksi takdirde herhangi bir seçim yapmadan İleri'ye tıklayın.
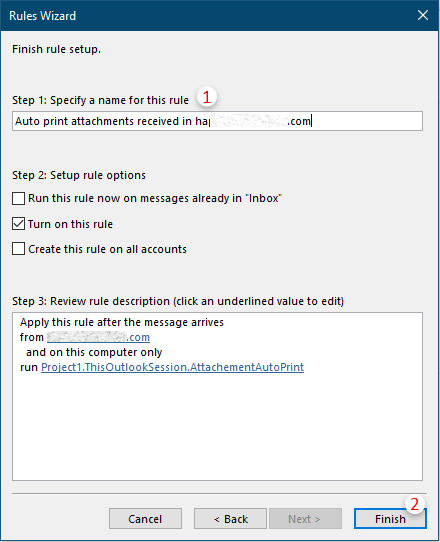
7. Son Rules Wizard'da, kural için bir isim belirtmeniz ve ardından Bitir düğmesine tıklamanız gerekiyor.
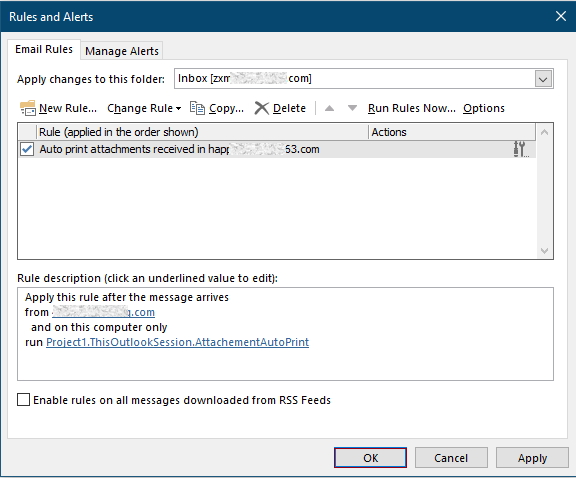
8. Daha sonra Kurallar ve Uyarılar iletişim kutusuna döner ve oluşturduğunuz kuralın listelendiğini görebilirsiniz, tüm ayarları tamamlamak için Tamam düğmesine tıklayın.
Şimdi itibaren, belirli bir kişiden bir e-posta alındığında, ekli dosyalar otomatik olarak yazdırılacaktır.
İlgili makaleler
Outlook'ta yalnızca bir e-postadan veya seçili e-postalardan ekleri yazdırma
Outlook'ta e-postaları yazdırabilirsiniz, ancak Outlook'ta yalnızca bir e-postadan veya seçili e-postalardan ekleri yazdırdınız mı? Bu makale, bu işi çözmek için ipuçlarını tanıtmaktadır.
Outlook'ta bir e-postanın yalnızca ileti başlığını yazdırma
Outlook'ta bir e-postayı yazdırdığınızda, e-postadaki ileti başlığı ve ileti içeriği birlikte yazdırılır. Ancak, bazı özel durumlarda, yalnızca konu, gönderen, alıcılar vb. ile ileti başlığını yazdırmak isteyebilirsiniz. Bu makale, bunu yapmak için iki çözüm tanıtacaktır.
Outlook'ta belirli/özel bir tarih aralığındaki takvimi yazdırma
Normalde, Outlook'ta Ay görünümünde bir takvimi yazdırdığınızda, şu anda seçili olan tarihi içeren ay otomatik olarak seçilir. Ancak, 3 ay, yarım yıl vb. gibi özel bir tarih aralığındaki takvimi yazdırmak isteyebilirsiniz. Bu makale, sizin için çözümü tanıtacaktır.
Outlook'ta bir kişi resmiyle birlikte yazdırma
Normalde, bir kişiyi Outlook'ta yazdırdığınızda, kişinin resmi yazdırılmaz. Ancak bazen, bir kişiyi resmiyle birlikte yazdırmak daha etkileyici olabilir. Bu makale, bunu gerçekleştirmek için bazı çözümler sunacaktır.
Outlook'ta bir e-postanın bir bölümünü yazdırma
Eğer bir e-posta mesajı aldınız ve e-postanın tamamını değil de içeriğinin bir bölümünü yazdırmak gerektiğini fark ettiyseniz ne yapardınız? Aslında, Outlook, Firefox ve Internet Explorer gibi internet tarayıcılarının yardımıyla bu işlemi gerçekleştirmenize yardımcı olabilir. Burada internet tarayıcılarını örnek olarak alacağım. Lütfen aşağıdaki öğreticilere bakın.
En İyi Ofis Verimlilik Araçları
Son Dakika: Kutools for Outlook Ücretsiz Sürümünü Sunmaya Başladı!
Yepyeni Kutools for Outlook ile100'den fazla etkileyici özelliği deneyimleyin! Şimdi indir!
📧 E-posta Otomasyonu: Otomatik Yanıt (POP ve IMAP için kullanılabilir) / E-posta Gönderimini Zamanla / E-posta Gönderirken Kurala Göre Otomatik CC/BCC / Gelişmiş Kurallar ile Otomatik Yönlendirme / Selamlama Ekle / Çoklu Alıcılı E-postaları Otomatik Olarak Bireysel Mesajlara Böl...
📨 E-posta Yönetimi: E-postayı Geri Çağır / Konu veya diğer kriterlere göre dolandırıcılık amaçlı e-postaları engelle / Yinelenen e-postaları sil / Gelişmiş Arama / Klasörleri Düzenle...
📁 Ekler Pro: Toplu Kaydet / Toplu Ayır / Toplu Sıkıştır / Otomatik Kaydet / Otomatik Ayır / Otomatik Sıkıştır...
🌟 Arayüz Büyüsü: 😊 Daha Fazla Şık ve Eğlenceli Emoji / Önemli e-postalar geldiğinde uyarı / Outlook'u kapatmak yerine küçült...
👍 Tek Tıkla Harikalar: Tümüne Eklerle Yanıtla / Kimlik Avı E-postalarına Karşı Koruma / 🕘 Gönderenin Saat Dilimini Göster...
👩🏼🤝👩🏻 Kişiler & Takvim: Seçilen E-postalardan Toplu Kişi Ekle / Bir Kişi Grubunu Bireysel Gruplara Böl / Doğum günü hatırlatıcısını kaldır...
Kutools'u tercih ettiğiniz dilde kullanın – İngilizce, İspanyolca, Almanca, Fransızca, Çince ve40'tan fazla başka dili destekler!


🚀 Tek Tıkla İndir — Tüm Ofis Eklentilerini Edinin
Şiddetle Tavsiye Edilen: Kutools for Office (5'i1 arada)
Tek tıkla beş kurulum paketini birden indirin — Kutools for Excel, Outlook, Word, PowerPoint ve Office Tab Pro. Şimdi indir!
- ✅ Tek tık kolaylığı: Beş kurulum paketinin hepsini tek seferde indirin.
- 🚀 Her türlü Ofis görevi için hazır: İhtiyacınız olan eklentileri istediğiniz zaman yükleyin.
- 🧰 Dahil olanlar: Kutools for Excel / Kutools for Outlook / Kutools for Word / Office Tab Pro / Kutools for PowerPoint