Var olan bir Word belgesine nasıl bir Word şablonu uygulanır?
Yeni bir Word belgesine şablon uygulamak oldukça basittir. Ancak, mevcut bir Word belgesinin şablonunu güncellemek veya değiştirmek daha karmaşık olabilir. Aşağıdaki yöntem, var olan bir belgeye Word şablonu uygulamanıza veya değiştirmenize kolaylık sağlayacaktır.
Var olan bir Word belgesine bir Word şablonu uygulama
Var olan bir Word belgesine bir Word şablonu uygulama
Var olan bir belgede Word şablonunu uygulamak veya değiştirmek için aşağıdaki adımları izleyin:
- Şablonu uygulamak istediğiniz Word belgesini açın. "Dosya" > "Seçenekler"e tıklayarak Word Seçenekleri iletişim kutusunu açın.
- Word Seçenekleri iletişim kutusunda:
- Sol kenar çubuğundaki "Eklentiler" seçeneğine tıklayın.
- "Yönet" açılır listesinden "Şablonlar" seçeneğini seçin.
- "Git" düğmesine tıklayın.

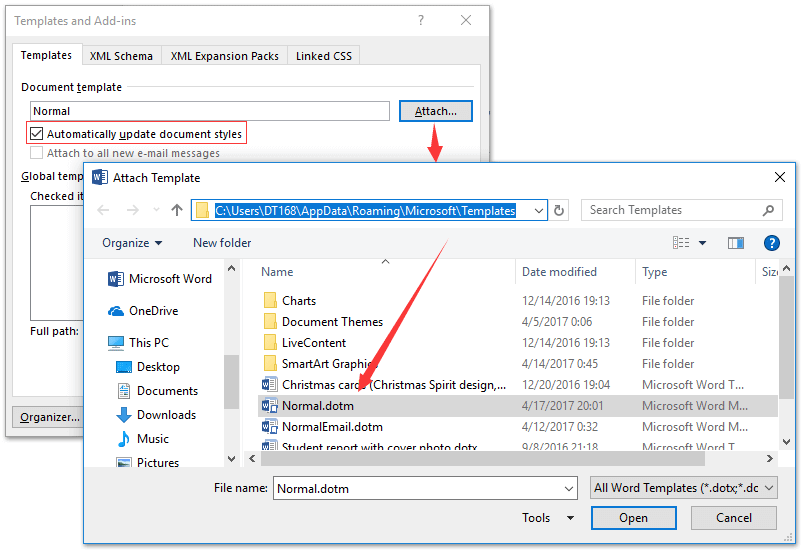
- Şablonlar ve Eklentiler iletişim kutusunda:
- "Belge stillerini otomatik olarak güncelle" seçeneğini işaretleyin.
- "Ekle" düğmesine tıklayın.

- Şablon Ekleme iletişim kutusunda:
- Kişisel şablonunuzun kaydedildiği klasörü açın.
- İstenilen şablon dosyasını seçin.
- "Aç" seçeneğine tıklayın.
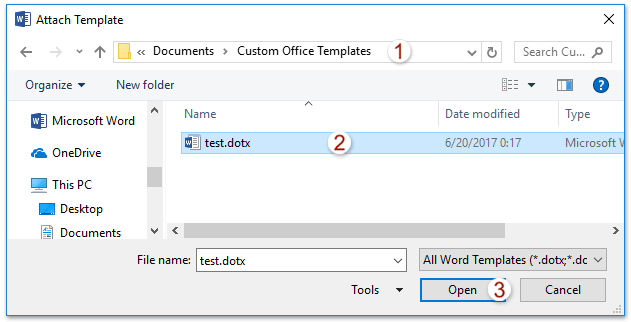
Not: Şablonunuzu varsayılan Özel Office Şablonları klasörüne kaydettiyseniz, %username%\Belgeler\Özel Office Şablonları yolu ile hızlıca erişebilirsiniz.
- Şablonlar ve Eklentiler iletişim kutusuna döndüğünüzde, "Tamam" seçeneğine tıklayın. Belirlenen şablon artık Word belgenize uygulanacaktır.

- Kişisel şablonu kaldırmak ve varsayılan Word şablonuna geri dönmek için yukarıdaki adımları tekrarlayın ve varsayılan şablon dosyasını seçin.
Not: Varsayılan şablon klasör yolu C:\Users\kullanıcı_adınız\AppData\Roaming\Microsoft\Şablonlar'dır.


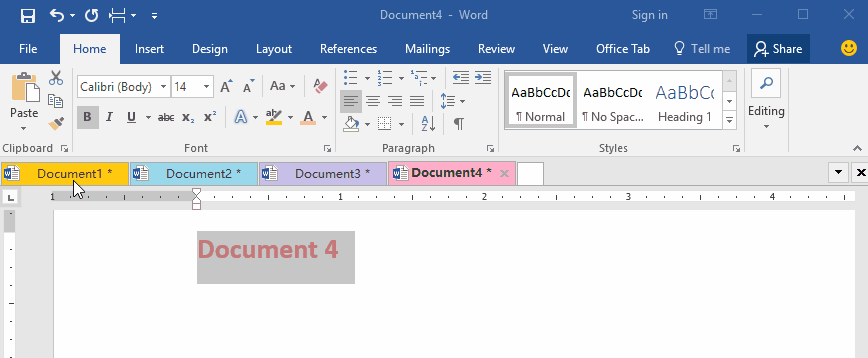
Birden Çok Word Belgesi İçin Sekmeli Göz Atma ve Düzenleme, Tıpkı Chrome ve Edge'de Olduğu Gibi!
Chrome, Safari ve Edge'deki gibi birden fazla web sayfasını aynı anda göz atabilirsiniz; Office Tab ile aynı pencerede birden fazla Word belgesini açabilir ve yönetebilirsiniz. Artık belgeler arasında geçiş yapmak için sekmelerine tıklamanız yeterli!
Office Tab'i şimdi ücretsiz dene!
En İyi Ofis Verimliliği Araçları
Kutools for Word - Word deneyiminizi 100 dikkate değer özellik ile geliştirin!
🤖 Kutools AI Features: AI Assistant / Real-Time Assistant / Süper Parlat (Biçimi Koru) / Süper Çeviri (Biçimi Koru) / AI Redaksiyon / Yapay Zeka Düzeltme...
📘 Belge Uzmanlığı: Sayfaları Böl / Belgeleri Birleştir / Aralığı PDF/TXT/DOC/HTML gibi çeşitli biçimlerde Dışa Aktar / Toplu PDF Dönüştürme...
✏ Metin Düzenleme: Birden fazla Dosyada Toplu Bul ve Değiştir / Tüm Resimleri Yeniden Boyutlandır / Satırları ve Sütunları Tabloyu Çevir / Tabloyu Metne Dönüştür...
🧹 Zahmetsiz Temizlik: Fazla Boşlukları Kaldır / Bölüm Sonlarını Kaldır / Metin Kutularını Kaldır / Bağlantıları Kaldır / Diğer kaldırma araçları için Kaldır grubuna göz atın...
➕ Yaratıcı Ekler: Binlik Ayırıcıları Ekle / Onay Kutuları Ekle / Radyo Düğmeleri Ekle / QR Kodu Oluştur / Barkod Oluştur / Birden fazla Resim Ekle / Daha fazlasını Ekle grubunda keşfedin...
🔍 Hassas Seçimler: Belirli Sayfa / Tabloları / Şekilleri / Başlık Paragraflarını tam olarak seçin / Daha fazla Seç özelliği ile gezinmeyi geliştirin...
⭐ Özel Geliştirmeler: Herhangi bir Aralığa Hızla Git / Tekrarlayan Metni Otomatik Ekle / Belge Pencereleri arasında geçiş yap /11 Dönüşüm aracı...
🌍 40+ Dil Desteği: Kutools'u tercih ettiğiniz dilde kullanın – İngilizce, İspanyolca, Almanca, Fransızca, Çince ve40'tan fazla dil destekleniyor!

✨ Kutools for Office – Tek kurulumda beş güçlü araç!
Şunları içerir: Office Tab Pro · Kutools for Excel · Kutools for Outlook · Kutools for Word · Kutools for PowerPoint
📦 Tüm5 araca tek bir pakette sahip olun | 🔗 Microsoft Office ile sorunsuz entegrasyon | ⚡ Zamanı Kaydet ve anında verimliliği artır
En İyi Ofis Verimliliği Araçları
Kutools for Word - 100+ Word için araçlar
- 🤖 Kutools AI Features: AI Assistant / Real-Time Assistant / Süper Parlat / Süper Çeviri / AI Redaksiyon / Yapay Zeka Düzeltme
- 📘 Belge Uzmanlığı: Sayfaları Böl / Belgeleri Birleştir / Toplu PDF Dönüştürme
- ✏ Metin Düzenleme: Toplu Bul ve Değiştir / Tüm Resimleri Yeniden Boyutlandır
- 🧹 Zahmetsiz Temizlik: Fazla Boşlukları Kaldır / Bölüm Sonlarını Kaldır
- ➕ Yaratıcı Ekler: Binlik Ayırıcıları Ekle / Onay Kutuları Ekle / QR Kodu Oluştur
- 🌍 40+ Dil Desteği: Kutools sizin dilinizde –40'tan fazla dil desteği!